> ## Documentation Index
> Fetch the complete documentation index at: https://docs.unifygtm.com/llms.txt
> Use this file to discover all available pages before exploring further.

# Create a play

> Build a website-visitor outreach workflow.

export const PlayBuilderCompanyHandleDark = () => <svg className="hidden dark:block" width="22" height="22" viewBox="0 0 22 22" fill="none" xmlns="http://www.w3.org/2000/svg">
    <path d="M0.5 11C0.5 5.20101 5.20101 0.5 11 0.5C16.799 0.5 21.5 5.20101 21.5 11C21.5 16.799 16.799 21.5 11 21.5C5.20101 21.5 0.5 16.799 0.5 11Z" fill="#403C2A" />
    <path d="M0.5 11C0.5 5.20101 5.20101 0.5 11 0.5C16.799 0.5 21.5 5.20101 21.5 11C21.5 16.799 16.799 21.5 11 21.5C5.20101 21.5 0.5 16.799 0.5 11Z" stroke="#404040" />
    <g clip-path="url(#clip0_2769_1689)">
      <path d="M5.75 16.25H16.25" stroke="#FFEE9A" stroke-width="1.5" stroke-linecap="round" stroke-linejoin="round" />
      <path d="M9.25 8.66663H9.83333" stroke="#FFEE9A" stroke-width="1.5" stroke-linecap="round" stroke-linejoin="round" />
      <path d="M9.25 11H9.83333" stroke="#FFEE9A" stroke-width="1.5" stroke-linecap="round" stroke-linejoin="round" />
      <path d="M9.25 13.3334H9.83333" stroke="#FFEE9A" stroke-width="1.5" stroke-linecap="round" stroke-linejoin="round" />
      <path d="M12.167 8.66663H12.7503" stroke="#FFEE9A" stroke-width="1.5" stroke-linecap="round" stroke-linejoin="round" />
      <path d="M12.167 11H12.7503" stroke="#FFEE9A" stroke-width="1.5" stroke-linecap="round" stroke-linejoin="round" />
      <path d="M12.167 13.3334H12.7503" stroke="#FFEE9A" stroke-width="1.5" stroke-linecap="round" stroke-linejoin="round" />
      <path d="M6.91699 16.25V6.91667C6.91699 6.60725 7.03991 6.3105 7.2587 6.09171C7.47749 5.87292 7.77424 5.75 8.08366 5.75H13.917C14.2264 5.75 14.5232 5.87292 14.7419 6.09171C14.9607 6.3105 15.0837 6.60725 15.0837 6.91667V16.25" stroke="#FFEE9A" stroke-width="1.5" stroke-linecap="round" stroke-linejoin="round" />
    </g>
    <defs>
      <clipPath id="clip0_2769_1689">
        <rect width="14" height="14" fill="white" transform="translate(4 4)" />
      </clipPath>
    </defs>
  </svg>;

export const PlayBuilderCompanyHandleLight = () => <svg className="block dark:hidden" width="22" height="22" viewBox="0 0 22 22" fill="none" xmlns="http://www.w3.org/2000/svg">
    <path d="M0.5 11C0.5 5.20101 5.20101 0.5 11 0.5C16.799 0.5 21.5 5.20101 21.5 11C21.5 16.799 16.799 21.5 11 21.5C5.20101 21.5 0.5 16.799 0.5 11Z" fill="#FFFAE6" />
    <path d="M0.5 11C0.5 5.20101 5.20101 0.5 11 0.5C16.799 0.5 21.5 5.20101 21.5 11C21.5 16.799 16.799 21.5 11 21.5C5.20101 21.5 0.5 16.799 0.5 11Z" stroke="#E2E2E2" />
    <g clip-path="url(#clip0_2769_1689)">
      <path d="M5.75 16.25H16.25" stroke="#887115" stroke-width="1.5" stroke-linecap="round" stroke-linejoin="round" />
      <path d="M9.25 8.66663H9.83333" stroke="#887115" stroke-width="1.5" stroke-linecap="round" stroke-linejoin="round" />
      <path d="M9.25 11H9.83333" stroke="#887115" stroke-width="1.5" stroke-linecap="round" stroke-linejoin="round" />
      <path d="M9.25 13.3334H9.83333" stroke="#887115" stroke-width="1.5" stroke-linecap="round" stroke-linejoin="round" />
      <path d="M12.167 8.66663H12.7503" stroke="#887115" stroke-width="1.5" stroke-linecap="round" stroke-linejoin="round" />
      <path d="M12.167 11H12.7503" stroke="#887115" stroke-width="1.5" stroke-linecap="round" stroke-linejoin="round" />
      <path d="M12.167 13.3334H12.7503" stroke="#887115" stroke-width="1.5" stroke-linecap="round" stroke-linejoin="round" />
      <path d="M6.91699 16.25V6.91667C6.91699 6.60725 7.03991 6.3105 7.2587 6.09171C7.47749 5.87292 7.77424 5.75 8.08366 5.75H13.917C14.2264 5.75 14.5232 5.87292 14.7419 6.09171C14.9607 6.3105 15.0837 6.60725 15.0837 6.91667V16.25" stroke="#887115" stroke-width="1.5" stroke-linecap="round" stroke-linejoin="round" />
    </g>
    <defs>
      <clipPath id="clip0_2769_1689">
        <rect width="14" height="14" fill="white" transform="translate(4 4)" />
      </clipPath>
    </defs>
  </svg>;

export const PlayBuilderPersonListHandleDark = () => <svg className="hidden dark:block" width="23" height="22" viewBox="0 0 23 22" fill="none" xmlns="http://www.w3.org/2000/svg">
    <path d="M1 11C1 5.20101 5.70101 0.5 11.5 0.5C17.299 0.5 22 5.20101 22 11C22 16.799 17.299 21.5 11.5 21.5C5.70101 21.5 1 16.799 1 11Z" fill="#323F3E" />
    <path d="M1 11C1 5.20101 5.70101 0.5 11.5 0.5C17.299 0.5 22 5.20101 22 11C22 16.799 17.299 21.5 11.5 21.5C5.70101 21.5 1 16.799 1 11Z" stroke="#404040" />
    <g clip-path="url(#clip0_2769_1947)">
      <path d="M12.083 12.1667C12.083 10.5558 13.3889 9.25 14.9997 9.25C16.6105 9.25 17.9163 10.5558 17.9163 12.1667V12.4583" stroke="#9DE6E2" stroke-width="1.5" stroke-linecap="round" stroke-linejoin="round" />
      <path d="M15 9.25C15.9665 9.25 16.75 8.4665 16.75 7.5C16.75 6.5335 15.9665 5.75 15 5.75C14.0335 5.75 13.25 6.5335 13.25 7.5C13.25 8.4665 14.0335 9.25 15 9.25Z" stroke="#9DE6E2" stroke-width="1.5" stroke-linecap="round" stroke-linejoin="round" />
      <path d="M5.08301 15.6667V15.0833C5.08301 12.8282 6.91118 11 9.16634 11C11.4215 11 13.2497 12.8282 13.2497 15.0833V15.6667" stroke="#9DE6E2" stroke-width="1.5" stroke-linecap="round" stroke-linejoin="round" />
      <path d="M9.16634 11C10.455 11 11.4997 9.95529 11.4997 8.66665C11.4997 7.37798 10.455 6.33331 9.16634 6.33331C7.87768 6.33331 6.83301 7.37798 6.83301 8.66665C6.83301 9.95529 7.87768 11 9.16634 11Z" stroke="#9DE6E2" stroke-width="1.5" stroke-linecap="round" stroke-linejoin="round" />
    </g>
    <defs>
      <clipPath id="clip0_2769_1947">
        <rect width="14" height="14" fill="white" transform="translate(4.5 4)" />
      </clipPath>
    </defs>
  </svg>;

export const PlayBuilderPersonListHandleLight = () => <svg className="block dark:hidden" width="23" height="22" viewBox="0 0 23 22" fill="none" xmlns="http://www.w3.org/2000/svg">
    <path d="M1 11C1 5.20101 5.70101 0.5 11.5 0.5C17.299 0.5 22 5.20101 22 11C22 16.799 17.299 21.5 11.5 21.5C5.70101 21.5 1 16.799 1 11Z" fill="#F0FBFA" />
    <path d="M1 11C1 5.20101 5.70101 0.5 11.5 0.5C17.299 0.5 22 5.20101 22 11C22 16.799 17.299 21.5 11.5 21.5C5.70101 21.5 1 16.799 1 11Z" stroke="#E2E2E2" />
    <g clip-path="url(#clip0_2769_1947)">
      <path d="M12.083 12.1667C12.083 10.5558 13.3889 9.25 14.9997 9.25C16.6105 9.25 17.9163 10.5558 17.9163 12.1667V12.4583" stroke="#0F837B" stroke-width="1.5" stroke-linecap="round" stroke-linejoin="round" />
      <path d="M15 9.25C15.9665 9.25 16.75 8.4665 16.75 7.5C16.75 6.5335 15.9665 5.75 15 5.75C14.0335 5.75 13.25 6.5335 13.25 7.5C13.25 8.4665 14.0335 9.25 15 9.25Z" stroke="#0F837B" stroke-width="1.5" stroke-linecap="round" stroke-linejoin="round" />
      <path d="M5.08301 15.6667V15.0833C5.08301 12.8282 6.91118 11 9.16634 11C11.4215 11 13.2497 12.8282 13.2497 15.0833V15.6667" stroke="#0F837B" stroke-width="1.5" stroke-linecap="round" stroke-linejoin="round" />
      <path d="M9.16634 11C10.455 11 11.4997 9.95529 11.4997 8.66665C11.4997 7.37798 10.455 6.33331 9.16634 6.33331C7.87768 6.33331 6.83301 7.37798 6.83301 8.66665C6.83301 9.95529 7.87768 11 9.16634 11Z" stroke="#0F837B" stroke-width="1.5" stroke-linecap="round" stroke-linejoin="round" />
    </g>
    <defs>
      <clipPath id="clip0_2769_1947">
        <rect width="14" height="14" fill="white" transform="translate(4.5 4)" />
      </clipPath>
    </defs>
  </svg>;

export const PlayBuilderPersonHandleDark = () => <svg className="hidden dark:block" width="22" height="22" viewBox="0 0 22 22" fill="none" xmlns="http://www.w3.org/2000/svg">
    <path d="M0.5 11C0.5 5.20101 5.20101 0.5 11 0.5C16.799 0.5 21.5 5.20101 21.5 11C21.5 16.799 16.799 21.5 11 21.5C5.20101 21.5 0.5 16.799 0.5 11Z" fill="#323F3E" />
    <path d="M0.5 11C0.5 5.20101 5.20101 0.5 11 0.5C16.799 0.5 21.5 5.20101 21.5 11C21.5 16.799 16.799 21.5 11 21.5C5.20101 21.5 0.5 16.799 0.5 11Z" stroke="#404040" />
    <path d="M6.91699 15.6667V15.0833C6.91699 12.8282 8.74516 11 11.0003 11C13.2555 11 15.0837 12.8282 15.0837 15.0833V15.6667" stroke="#9DE6E2" stroke-width="1.5" stroke-linecap="round" stroke-linejoin="round" />
    <path d="M11.0003 11.0002C12.289 11.0002 13.3337 9.95547 13.3337 8.66683C13.3337 7.37816 12.289 6.3335 11.0003 6.3335C9.71166 6.3335 8.66699 7.37816 8.66699 8.66683C8.66699 9.95547 9.71166 11.0002 11.0003 11.0002Z" stroke="#9DE6E2" stroke-width="1.5" stroke-linecap="round" stroke-linejoin="round" />
  </svg>;

export const PlayBuilderPersonHandleLight = () => <svg className="block dark:hidden" width="22" height="22" viewBox="0 0 22 22" fill="none" xmlns="http://www.w3.org/2000/svg">
    <path d="M0.5 11C0.5 5.20101 5.20101 0.5 11 0.5C16.799 0.5 21.5 5.20101 21.5 11C21.5 16.799 16.799 21.5 11 21.5C5.20101 21.5 0.5 16.799 0.5 11Z" fill="#F0FBFA" />
    <path d="M0.5 11C0.5 5.20101 5.20101 0.5 11 0.5C16.799 0.5 21.5 5.20101 21.5 11C21.5 16.799 16.799 21.5 11 21.5C5.20101 21.5 0.5 16.799 0.5 11Z" stroke="#E2E2E2" />
    <path d="M6.91699 15.6667V15.0833C6.91699 12.8282 8.74516 11 11.0003 11C13.2555 11 15.0837 12.8282 15.0837 15.0833V15.6667" stroke="#0F837B" stroke-width="1.5" stroke-linecap="round" stroke-linejoin="round" />
    <path d="M11.0003 11.0002C12.289 11.0002 13.3337 9.95547 13.3337 8.66683C13.3337 7.37816 12.289 6.3335 11.0003 6.3335C9.71166 6.3335 8.66699 7.37816 8.66699 8.66683C8.66699 9.95547 9.71166 11.0002 11.0003 11.0002Z" stroke="#0F837B" stroke-width="1.5" stroke-linecap="round" stroke-linejoin="round" />
  </svg>;

export const ThemedImageFrame = ({lightSrc, darkSrc, alt, caption}) => <Frame caption={caption}>
    <div className="block w-full dark:hidden">
      <OptimizedImage className="w-full" src={lightSrc} alt={(alt ?? caption) ?? ""} />
    </div>
    <div className="hidden w-full dark:block">
      <OptimizedImage className="w-full" src={darkSrc} alt={(alt ?? caption) ?? ""} />
    </div>
  </Frame>;

## Overview

Create a play that finds prospects at companies visiting your website, enrolls
eligible people in a sequence, and syncs their records to your CRM.

Before you begin, set up [website visitor tracking](/reference/signals/website-visitors),
define your [personas](/tutorials/how-to-use-personas), and
[create and publish a template sequence](/reference/sequences/create-a-sequence)
with a connected sending mailbox. The CRM action also needs a workspace CRM
connection with bidirectional syncs enabled.

## Walkthrough

<Steps>
  <Step title="Create a play">
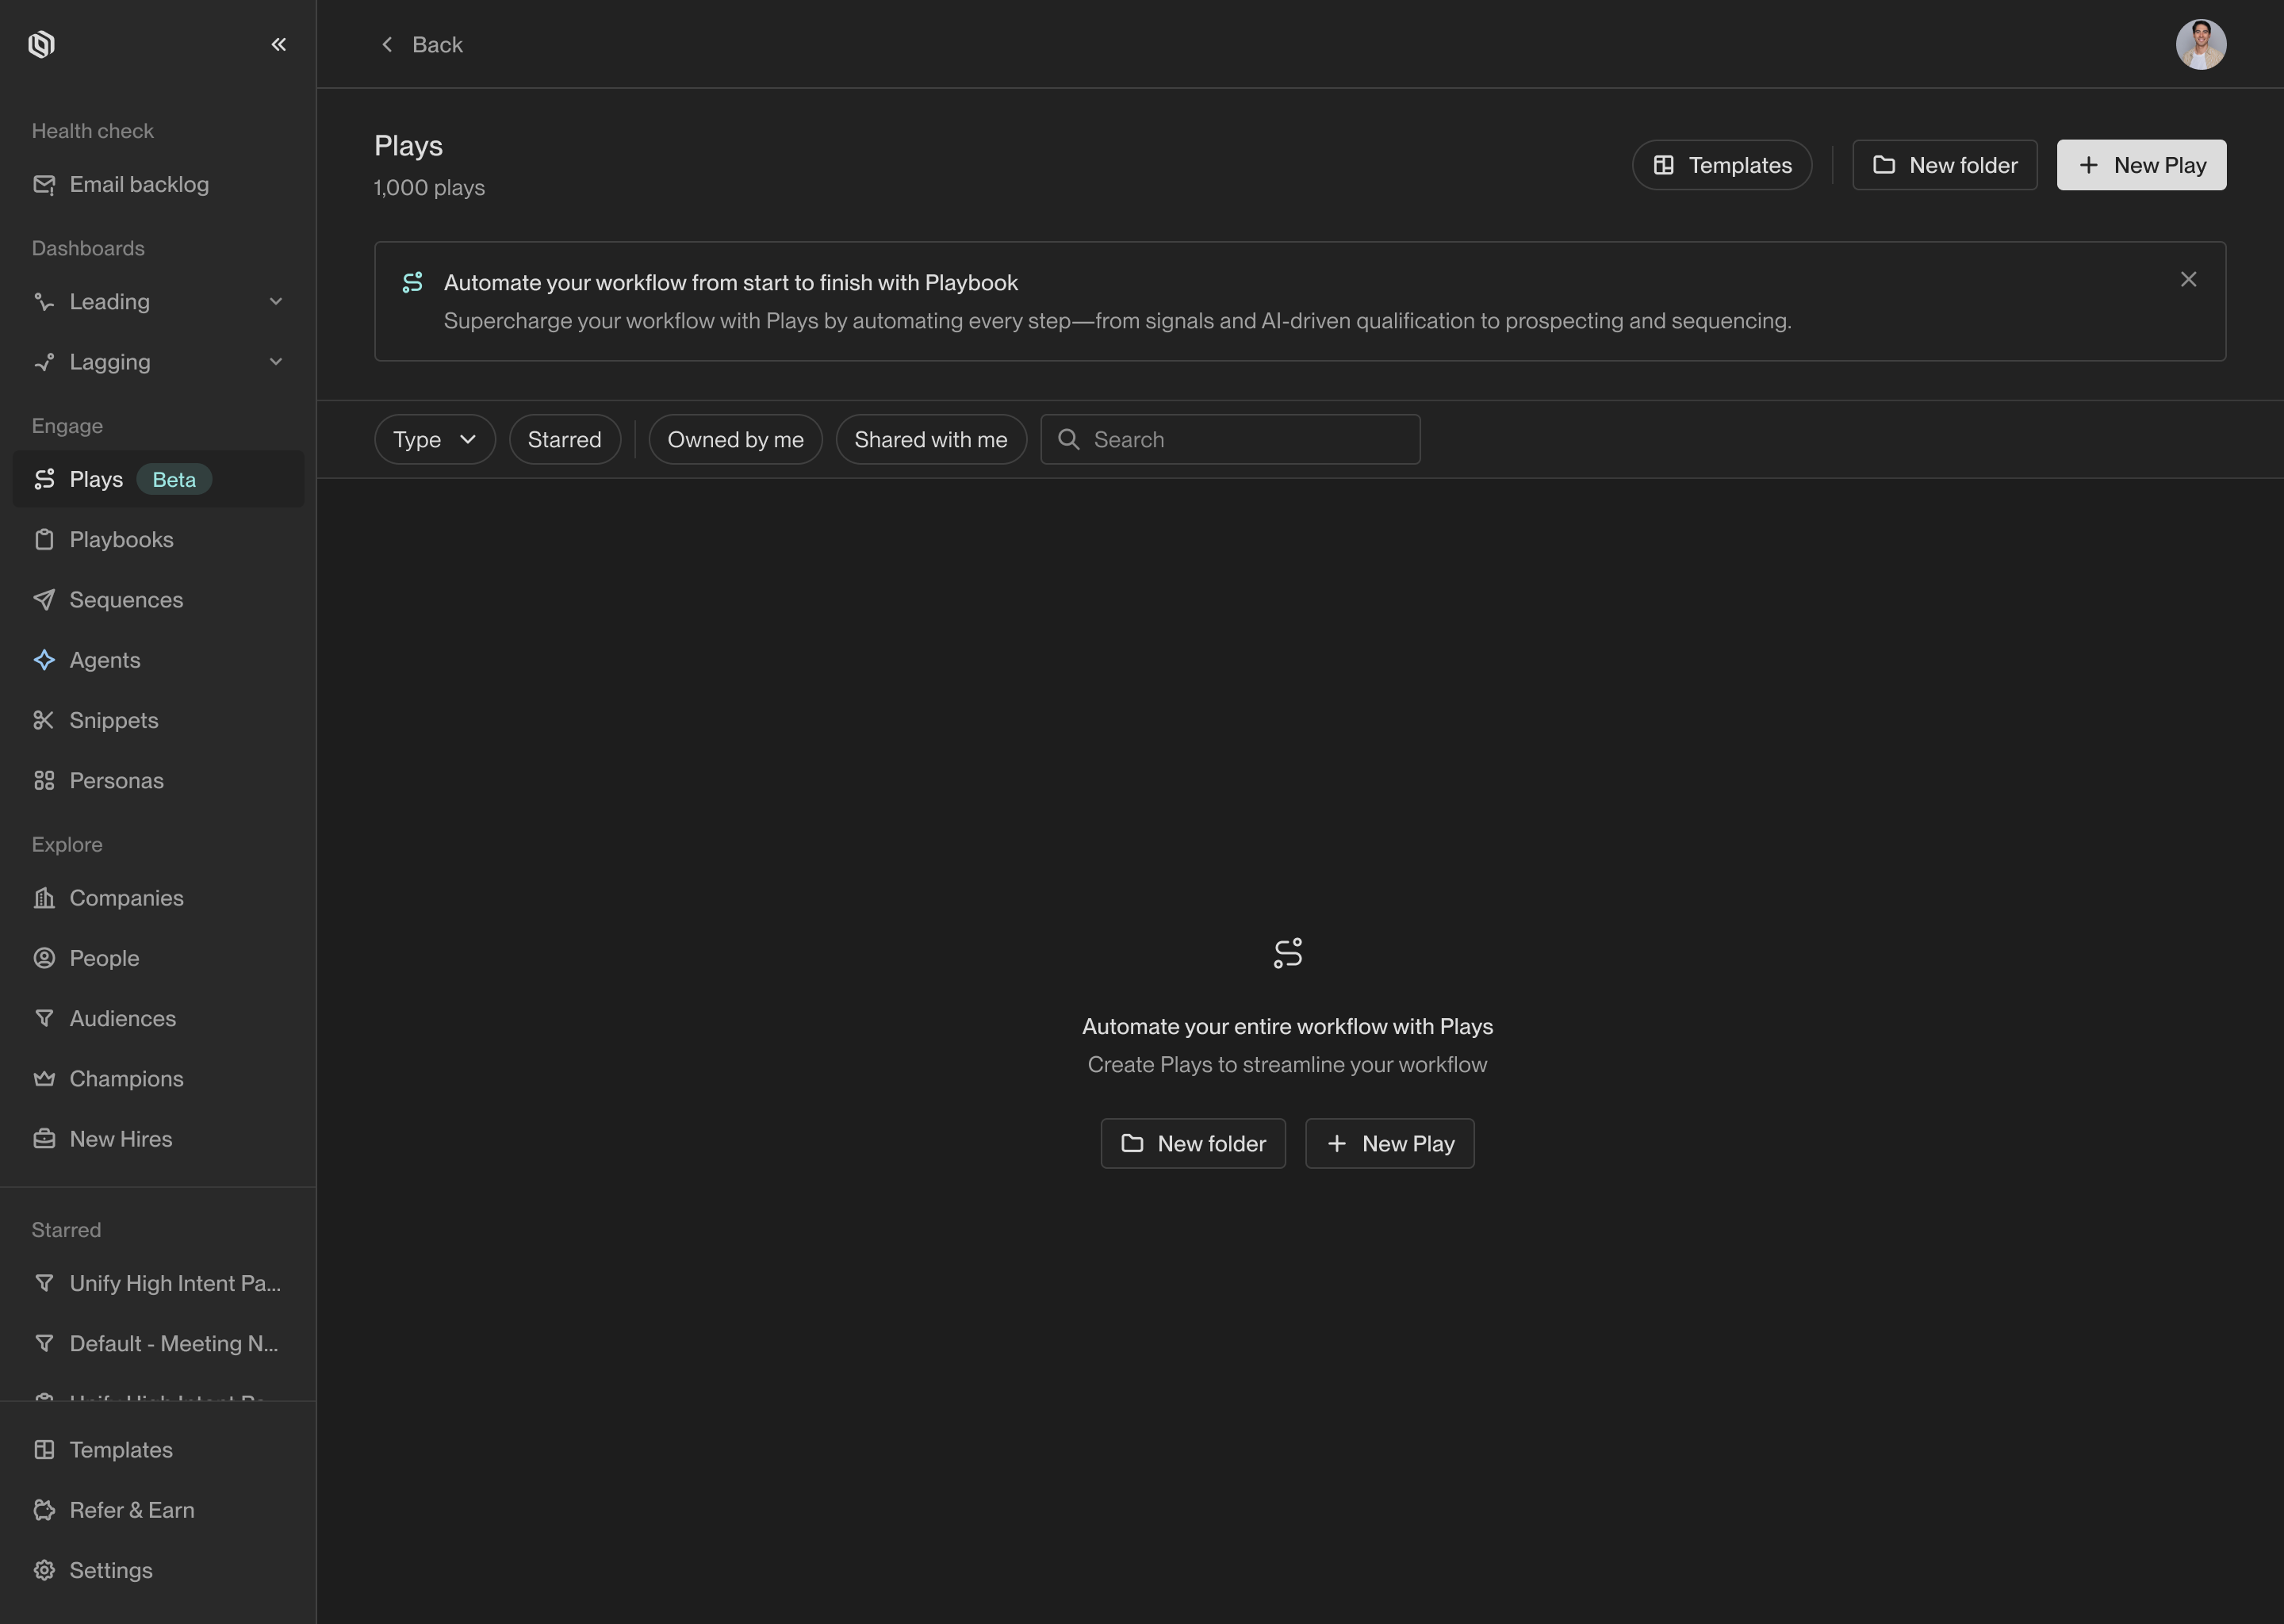
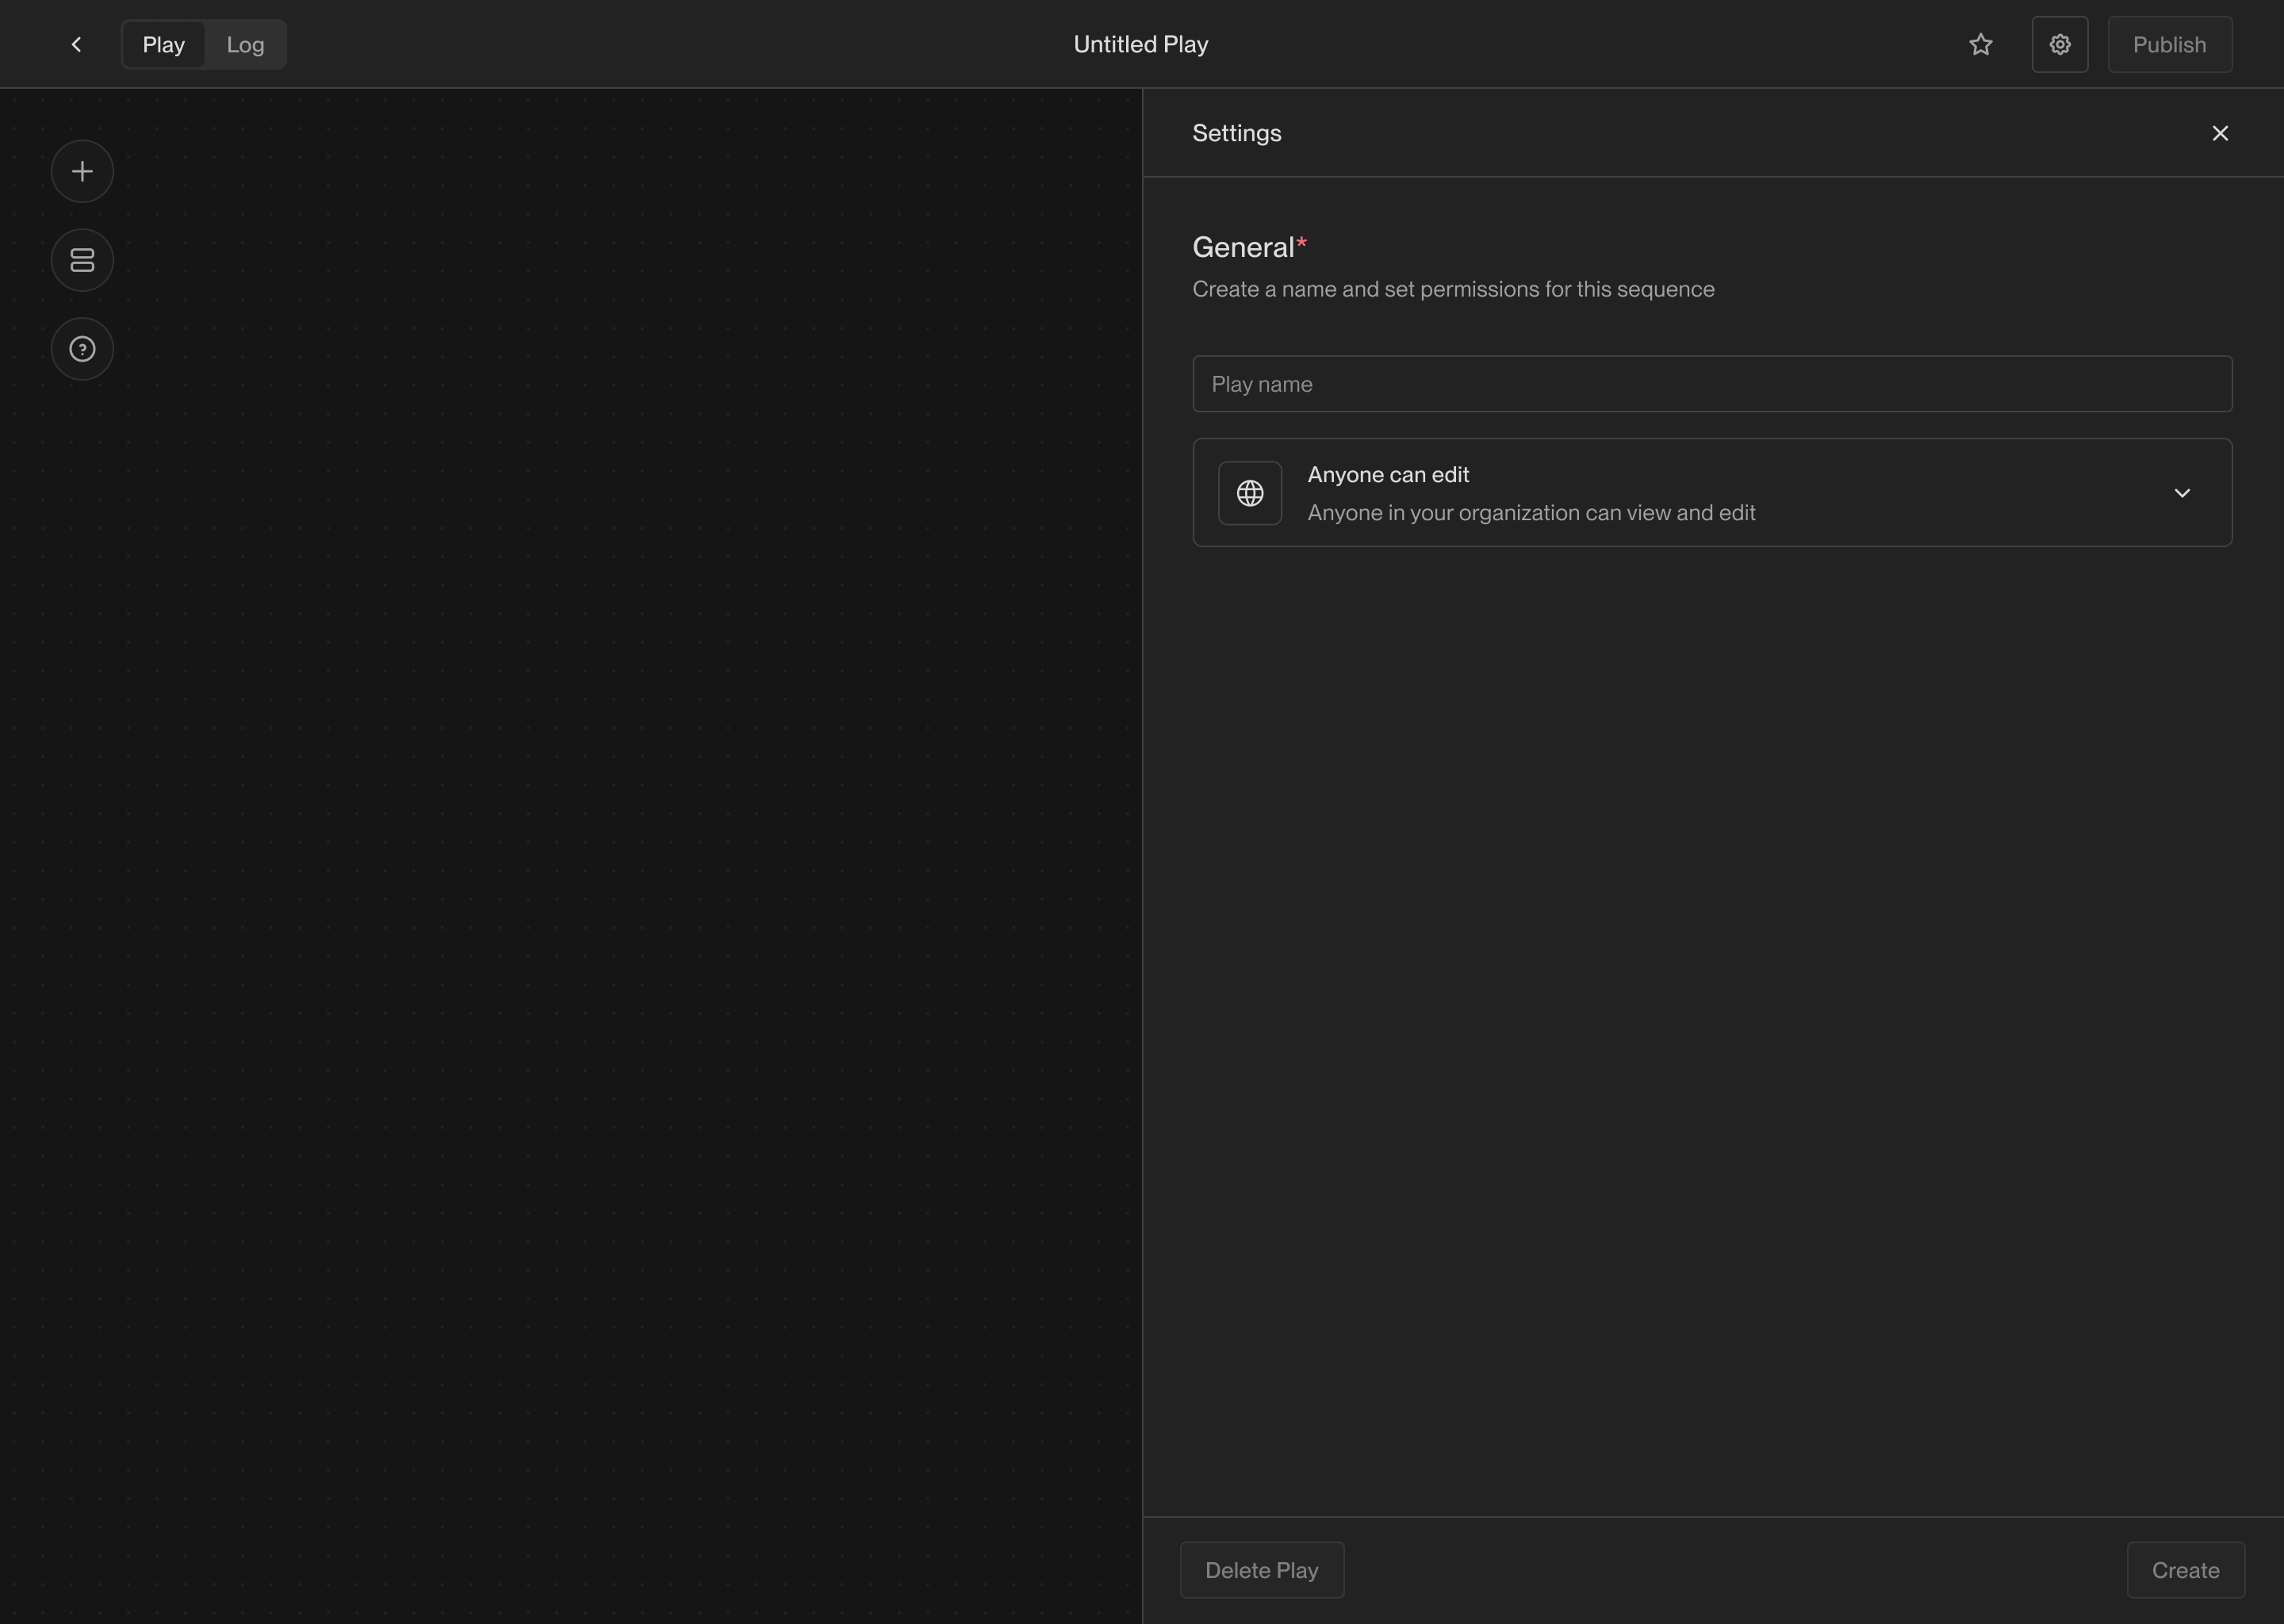
    Open [Plays](https://app.unifygtm.com/dashboard/plays) and click **New Play**.

    <Frame caption="This is what the plays tab will look like before creating any plays.">
      <img src="https://mintcdn.com/unify-19/QTxNj2fcd-br9FnE/images/tutorials/how-to-create-a-play/plays-tab-empty.png?fit=max&auto=format&n=QTxNj2fcd-br9FnE&q=85&s=cff29c75d17bdbf3027f07ab3436d35b" alt="This is what the plays tab will look like before creating any plays." width="2880" height="2048" data-path="images/tutorials/how-to-create-a-play/plays-tab-empty.png" />
    </Frame>

    <Frame caption="When you create a play, you will be prompted to give it a name.">
      <img src="https://mintcdn.com/unify-19/QTxNj2fcd-br9FnE/images/tutorials/how-to-create-a-play/plays-tab-new.png?fit=max&auto=format&n=QTxNj2fcd-br9FnE&q=85&s=e58d97141cac834403326072d465b2d7" alt="When you create a play, you will be prompted to give it a name." width="2880" height="2048" data-path="images/tutorials/how-to-create-a-play/plays-tab-new.png" />
    </Frame>

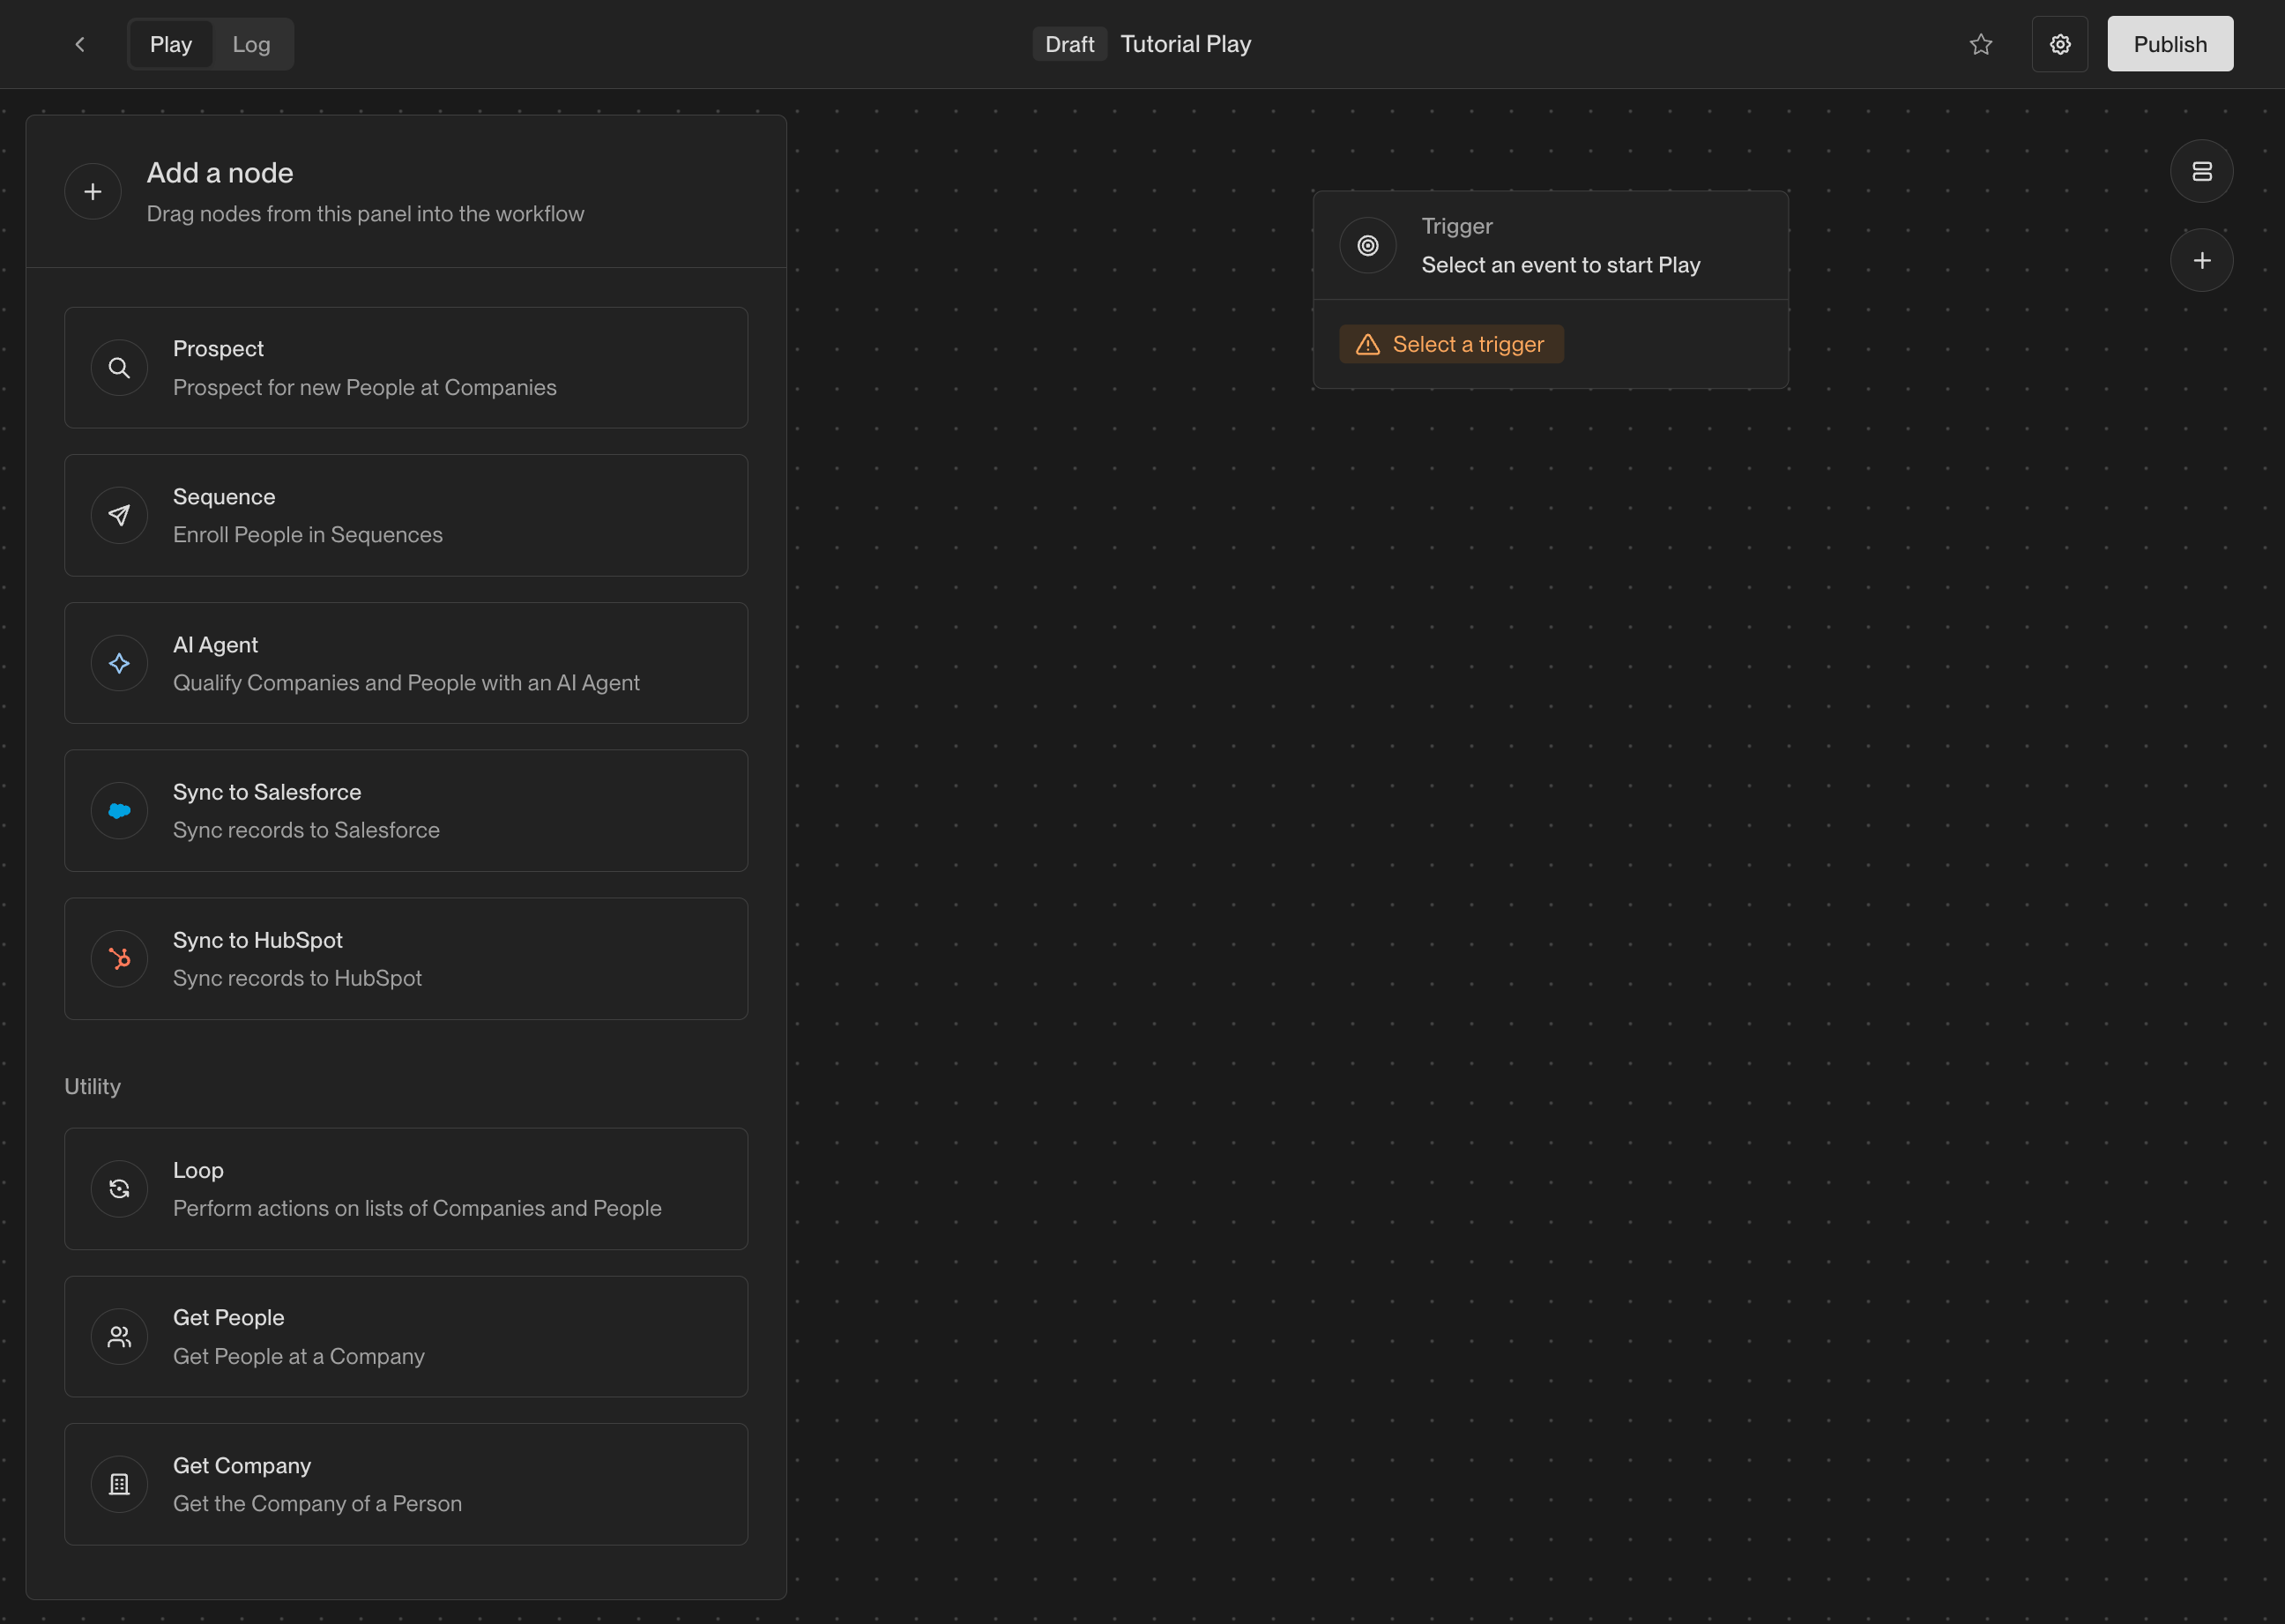
    <Frame caption="Once the play is created, you will see the play builder.">
      <img src="https://mintcdn.com/unify-19/QTxNj2fcd-br9FnE/images/tutorials/how-to-create-a-play/play-builder-new.png?fit=max&auto=format&n=QTxNj2fcd-br9FnE&q=85&s=6ba2735b3691266d12815fe96566a4ed" alt="Once the play is created, you will see the play builder." width="2592" height="1842" data-path="images/tutorials/how-to-create-a-play/play-builder-new.png" />
    </Frame>
  </Step>

  <Step title="Choose a trigger">
    Once you've created a new play, you will see the play builder. The first step
    when building any play is to choose a *trigger*. The trigger lets you specify
    exactly when the play should run and which companies or people it should run on.

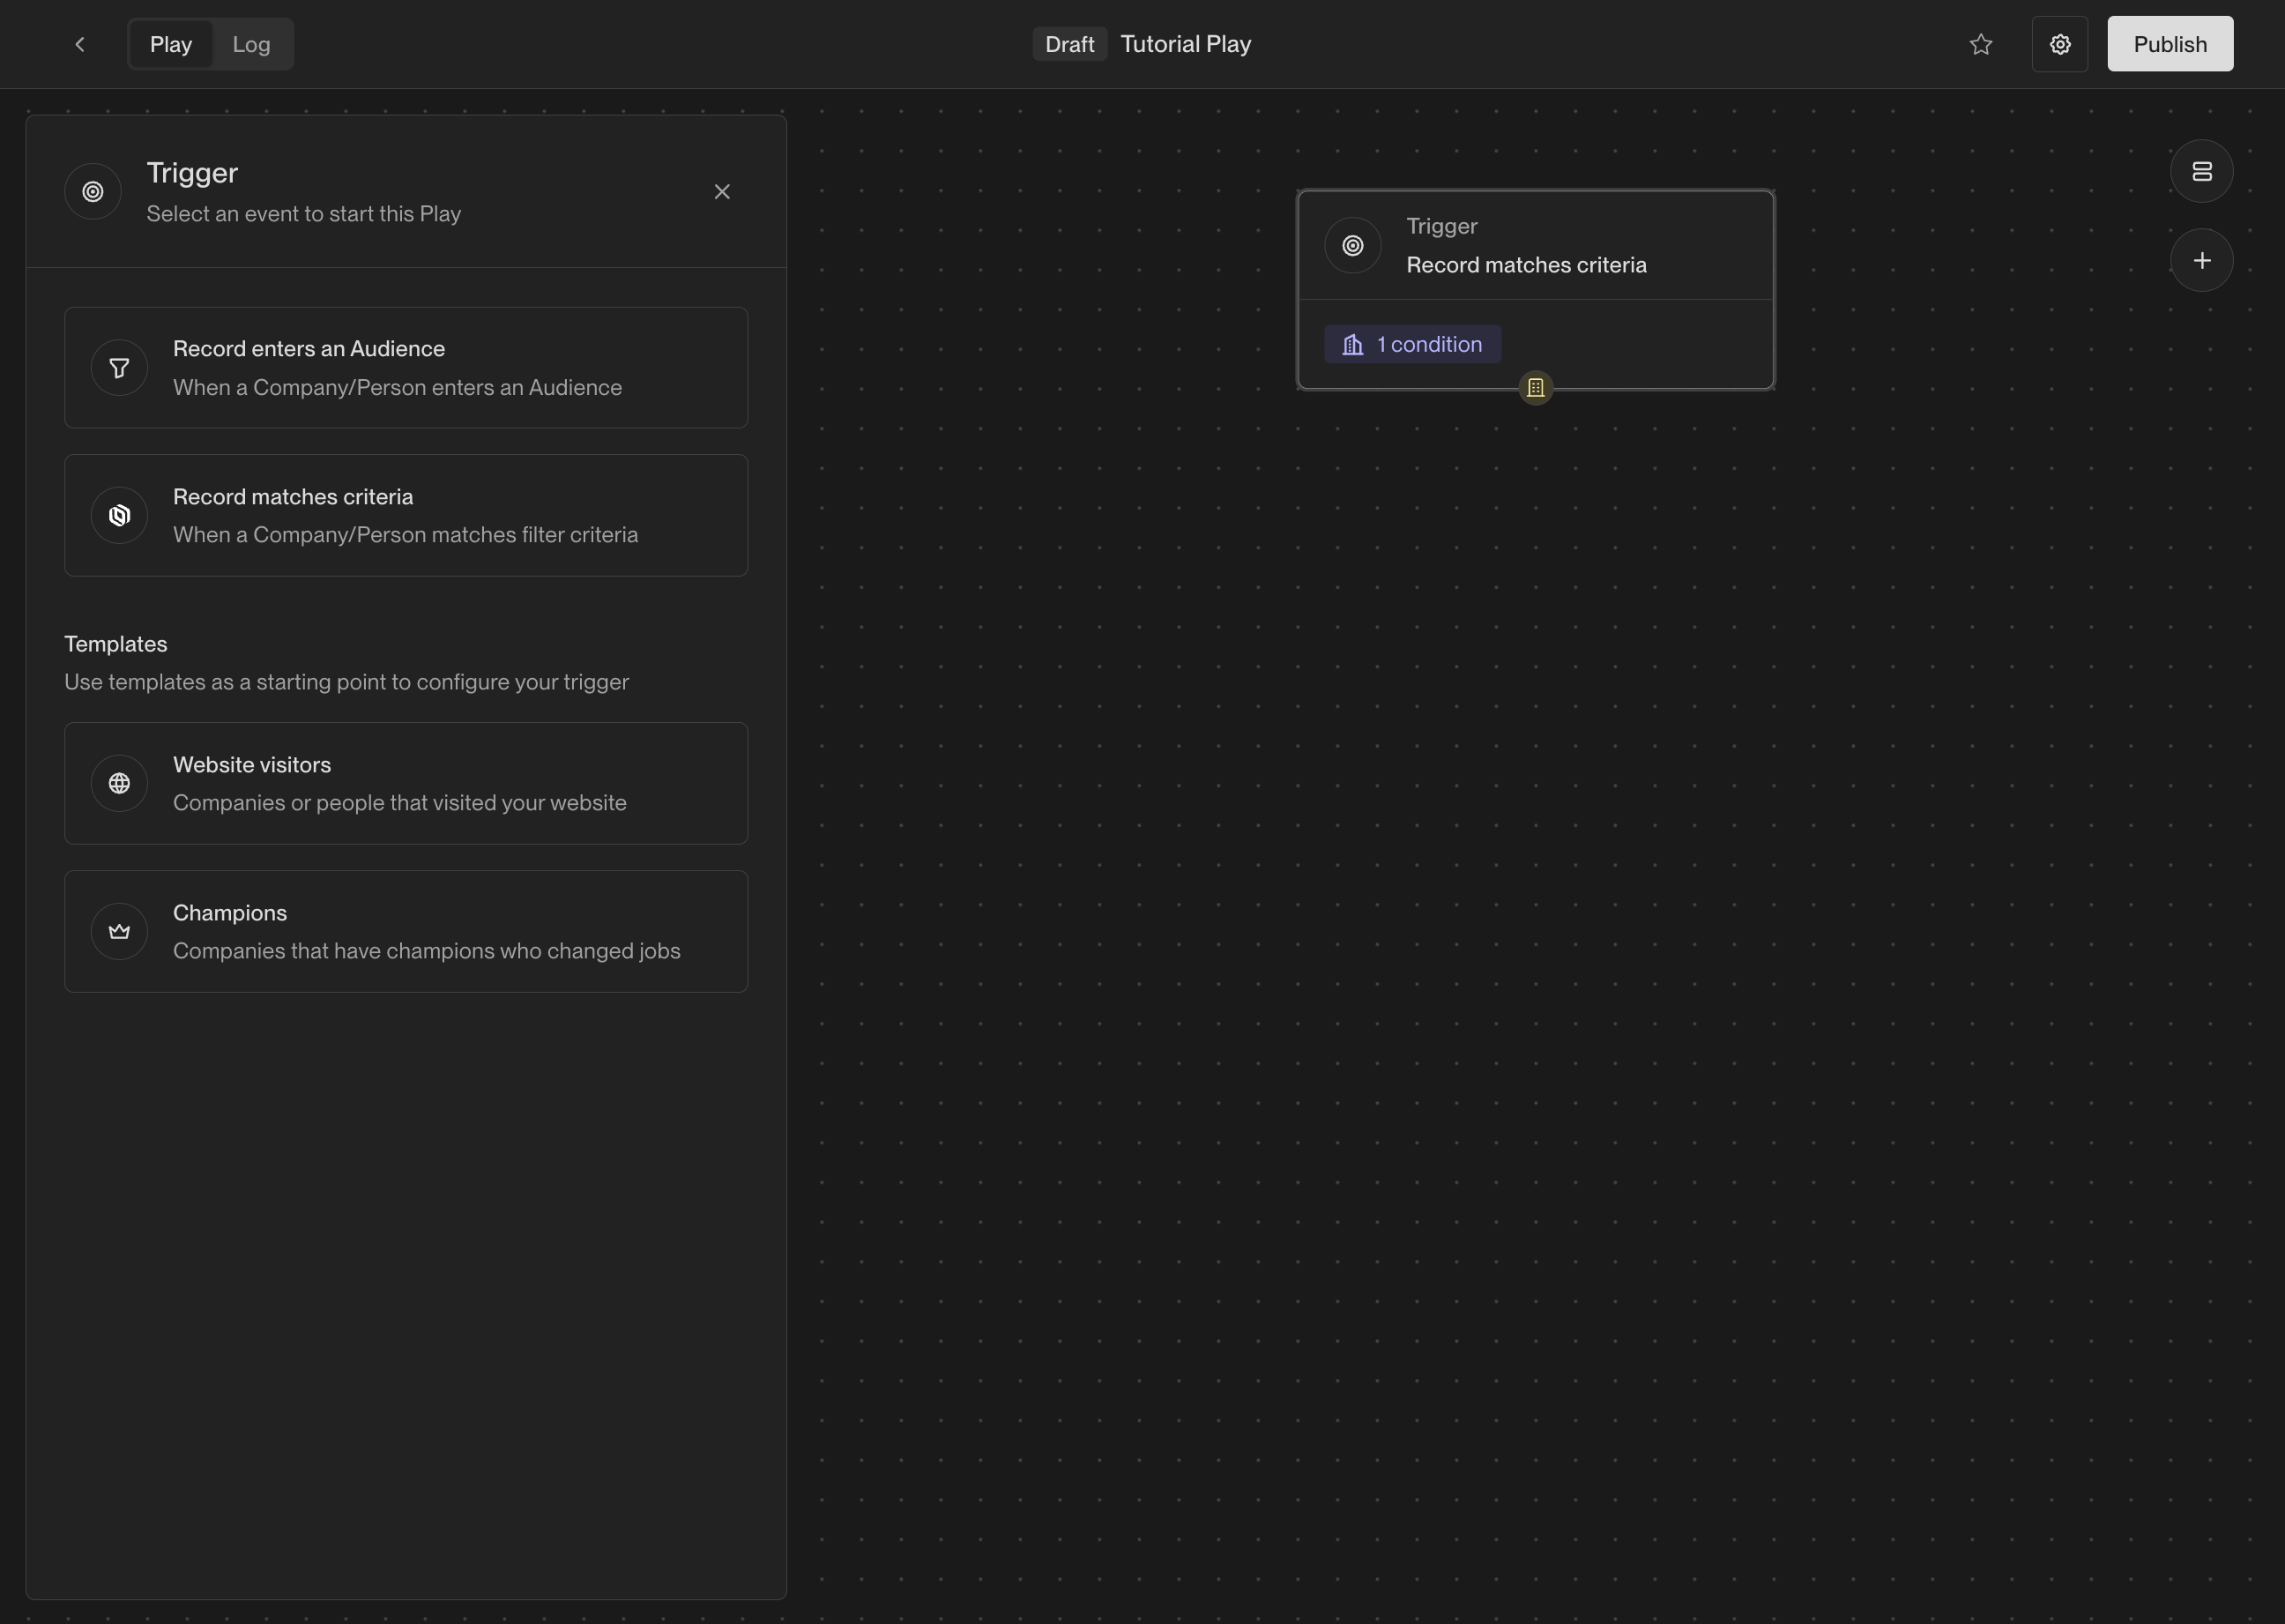
    In the center of the builder, you will see an action that says **Select a trigger**.
    Click on it to show the trigger configuration panel. For this play, choose the
    **Website visitors** template.

    <Frame caption="Select a trigger type or a template from the configuration panel.">
      <img src="https://mintcdn.com/unify-19/QTxNj2fcd-br9FnE/images/tutorials/how-to-create-a-play/play-builder-trigger-selection.png?fit=max&auto=format&n=QTxNj2fcd-br9FnE&q=85&s=626c8d9051dcc830b29cec3b3ef5186c" alt="Select a trigger type or a template from the configuration panel." width="2592" height="1842" data-path="images/tutorials/how-to-create-a-play/play-builder-trigger-selection.png" />
    </Frame>

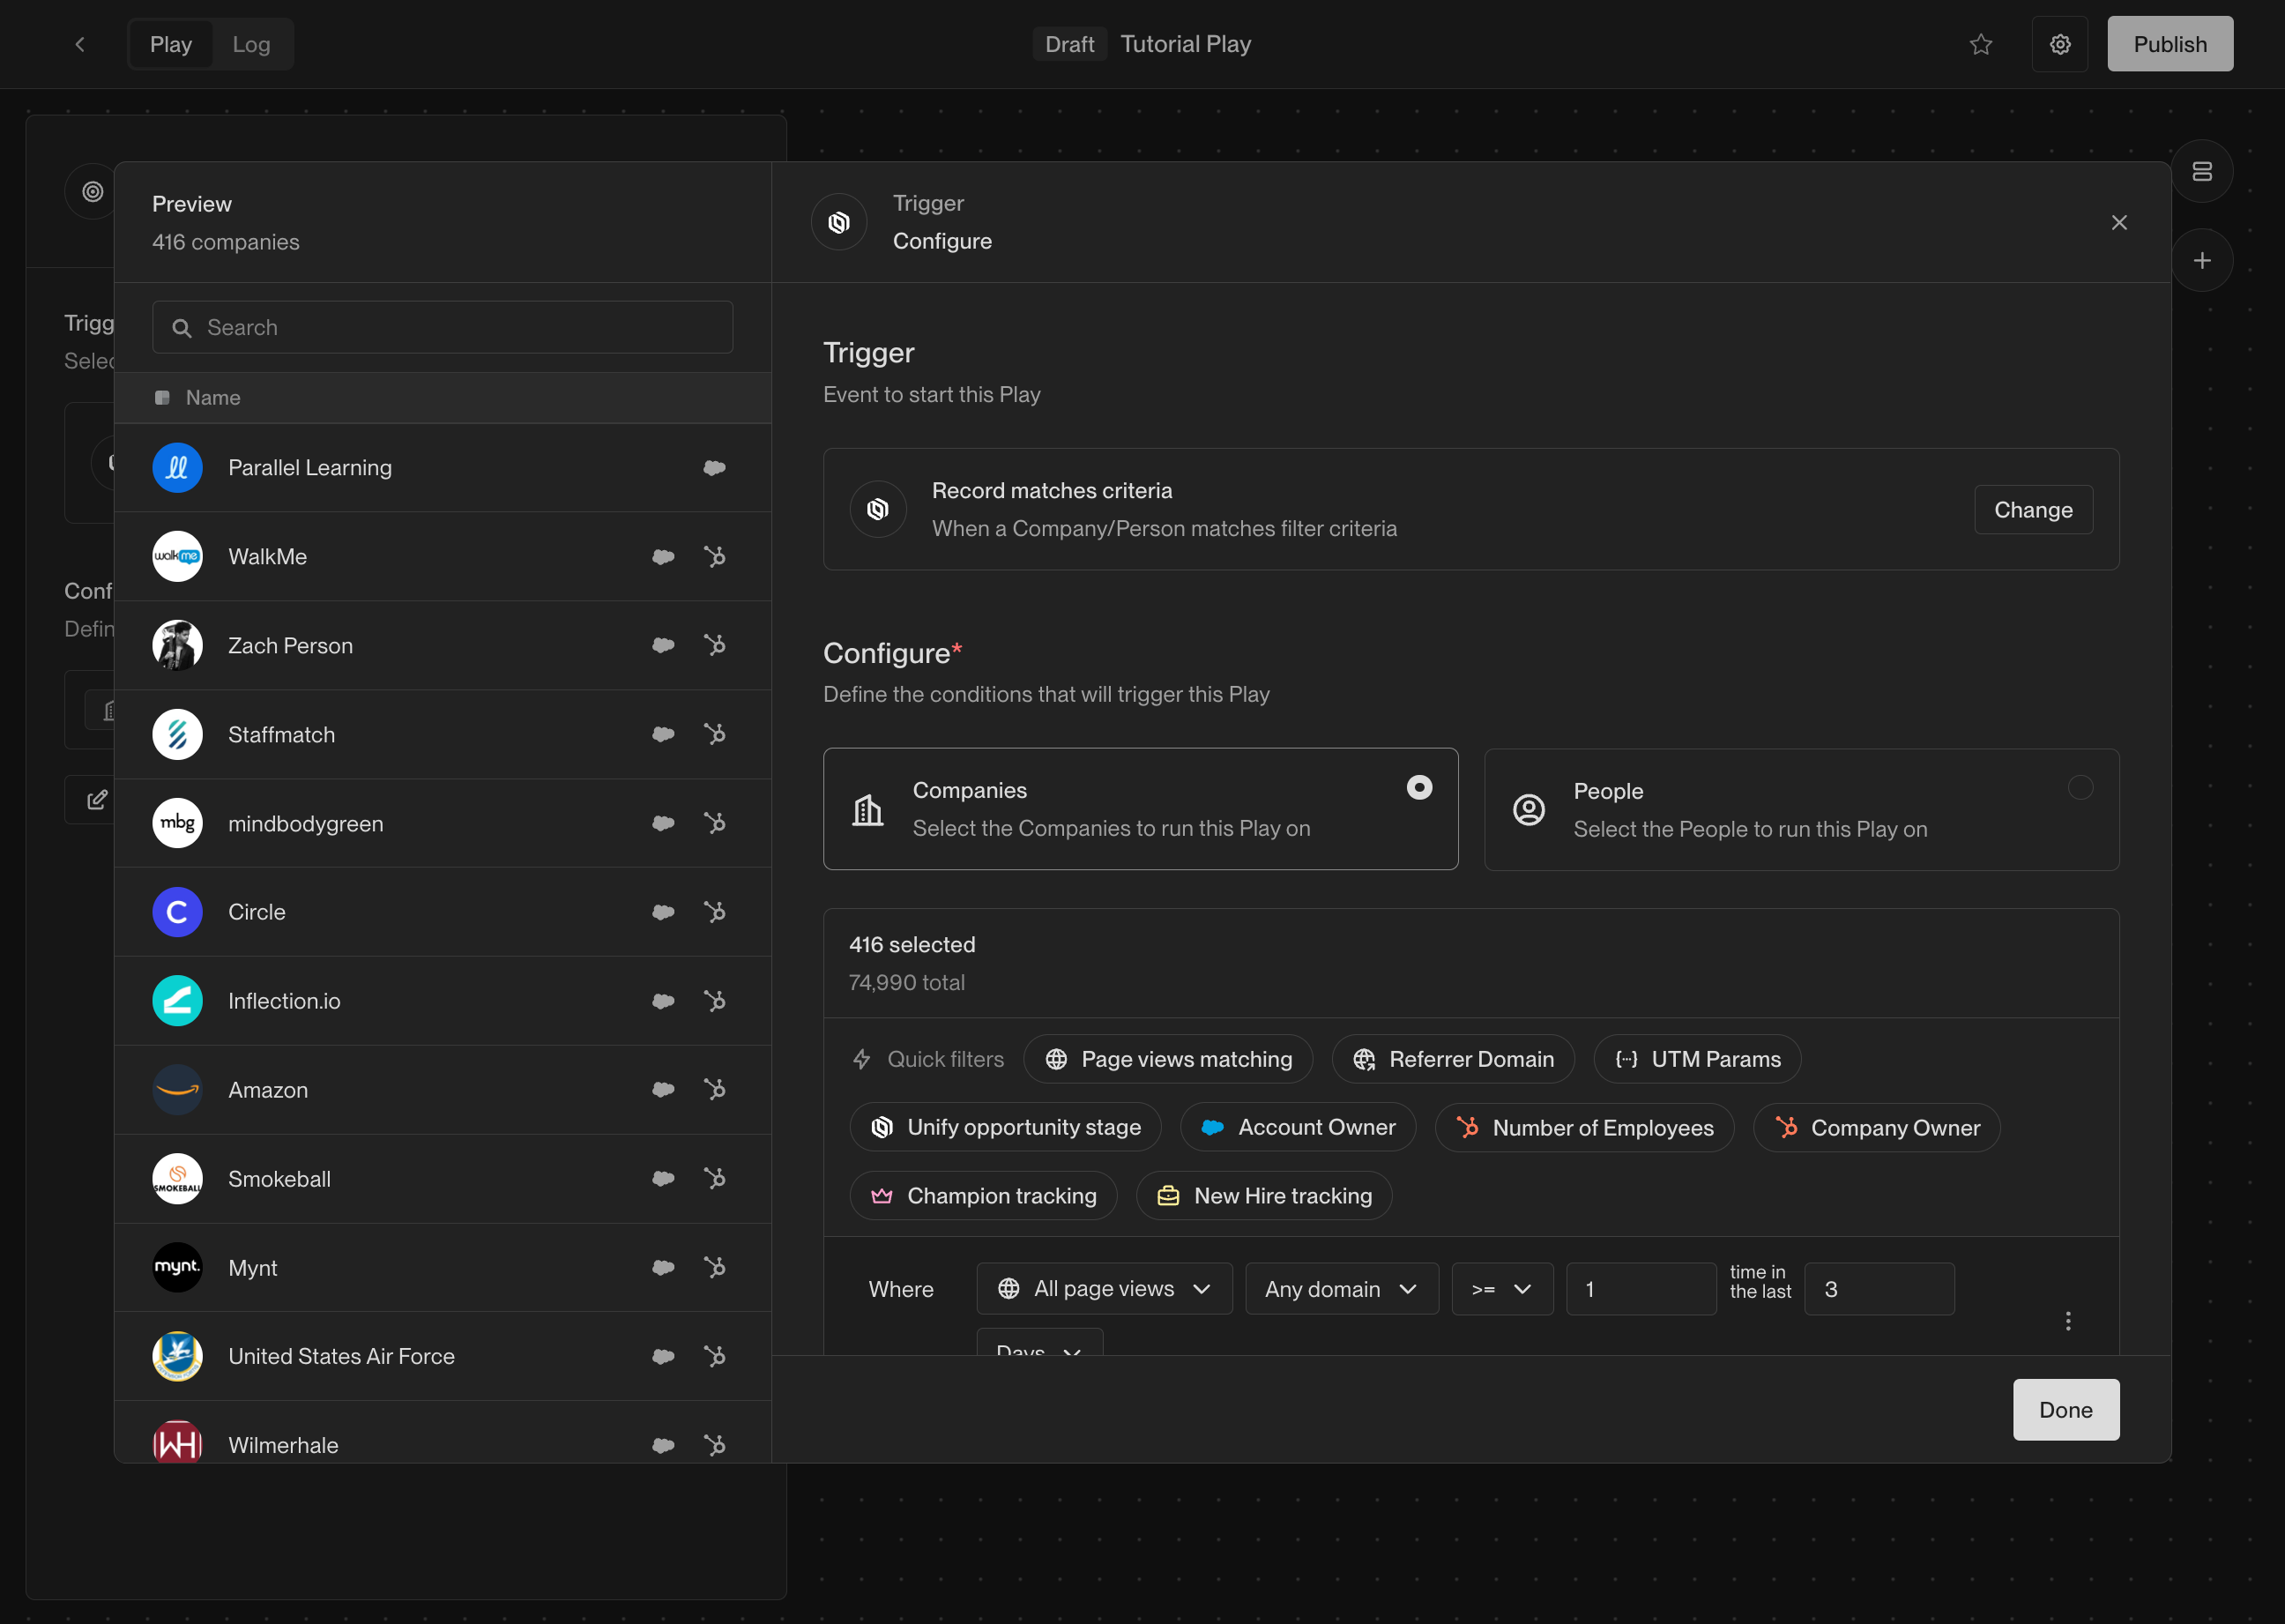
    <Frame caption="This is where you define the criteria for companies that this play will run on.">
      <img src="https://mintcdn.com/unify-19/QTxNj2fcd-br9FnE/images/tutorials/how-to-create-a-play/play-builder-trigger-configuration.png?fit=max&auto=format&n=QTxNj2fcd-br9FnE&q=85&s=2b206749d5a5ce26f820f6ae9292a32e" alt="This is where you define the criteria for companies that this play will run on." width="2592" height="1842" data-path="images/tutorials/how-to-create-a-play/play-builder-trigger-configuration.png" />
    </Frame>

    Here you have the option to further filter and refine the companies that this
    play will run on. For example, if you only want to run this play on companies
    with more than 100 employees, you can add a filter on **Employee Count**.

    You can learn more about the available filters and how to use them in the tutorial
    [Create an audience](/reference/lists/create-an-audience). You can always
    return later to add or modify filters. Click **Done** to finish configuring the
    trigger.
  </Step>

  <Step title="Add actions">
    Add prospecting, sequence enrollment, and CRM sync actions. Use a loop to run
    the enrollment and sync actions for each person found.

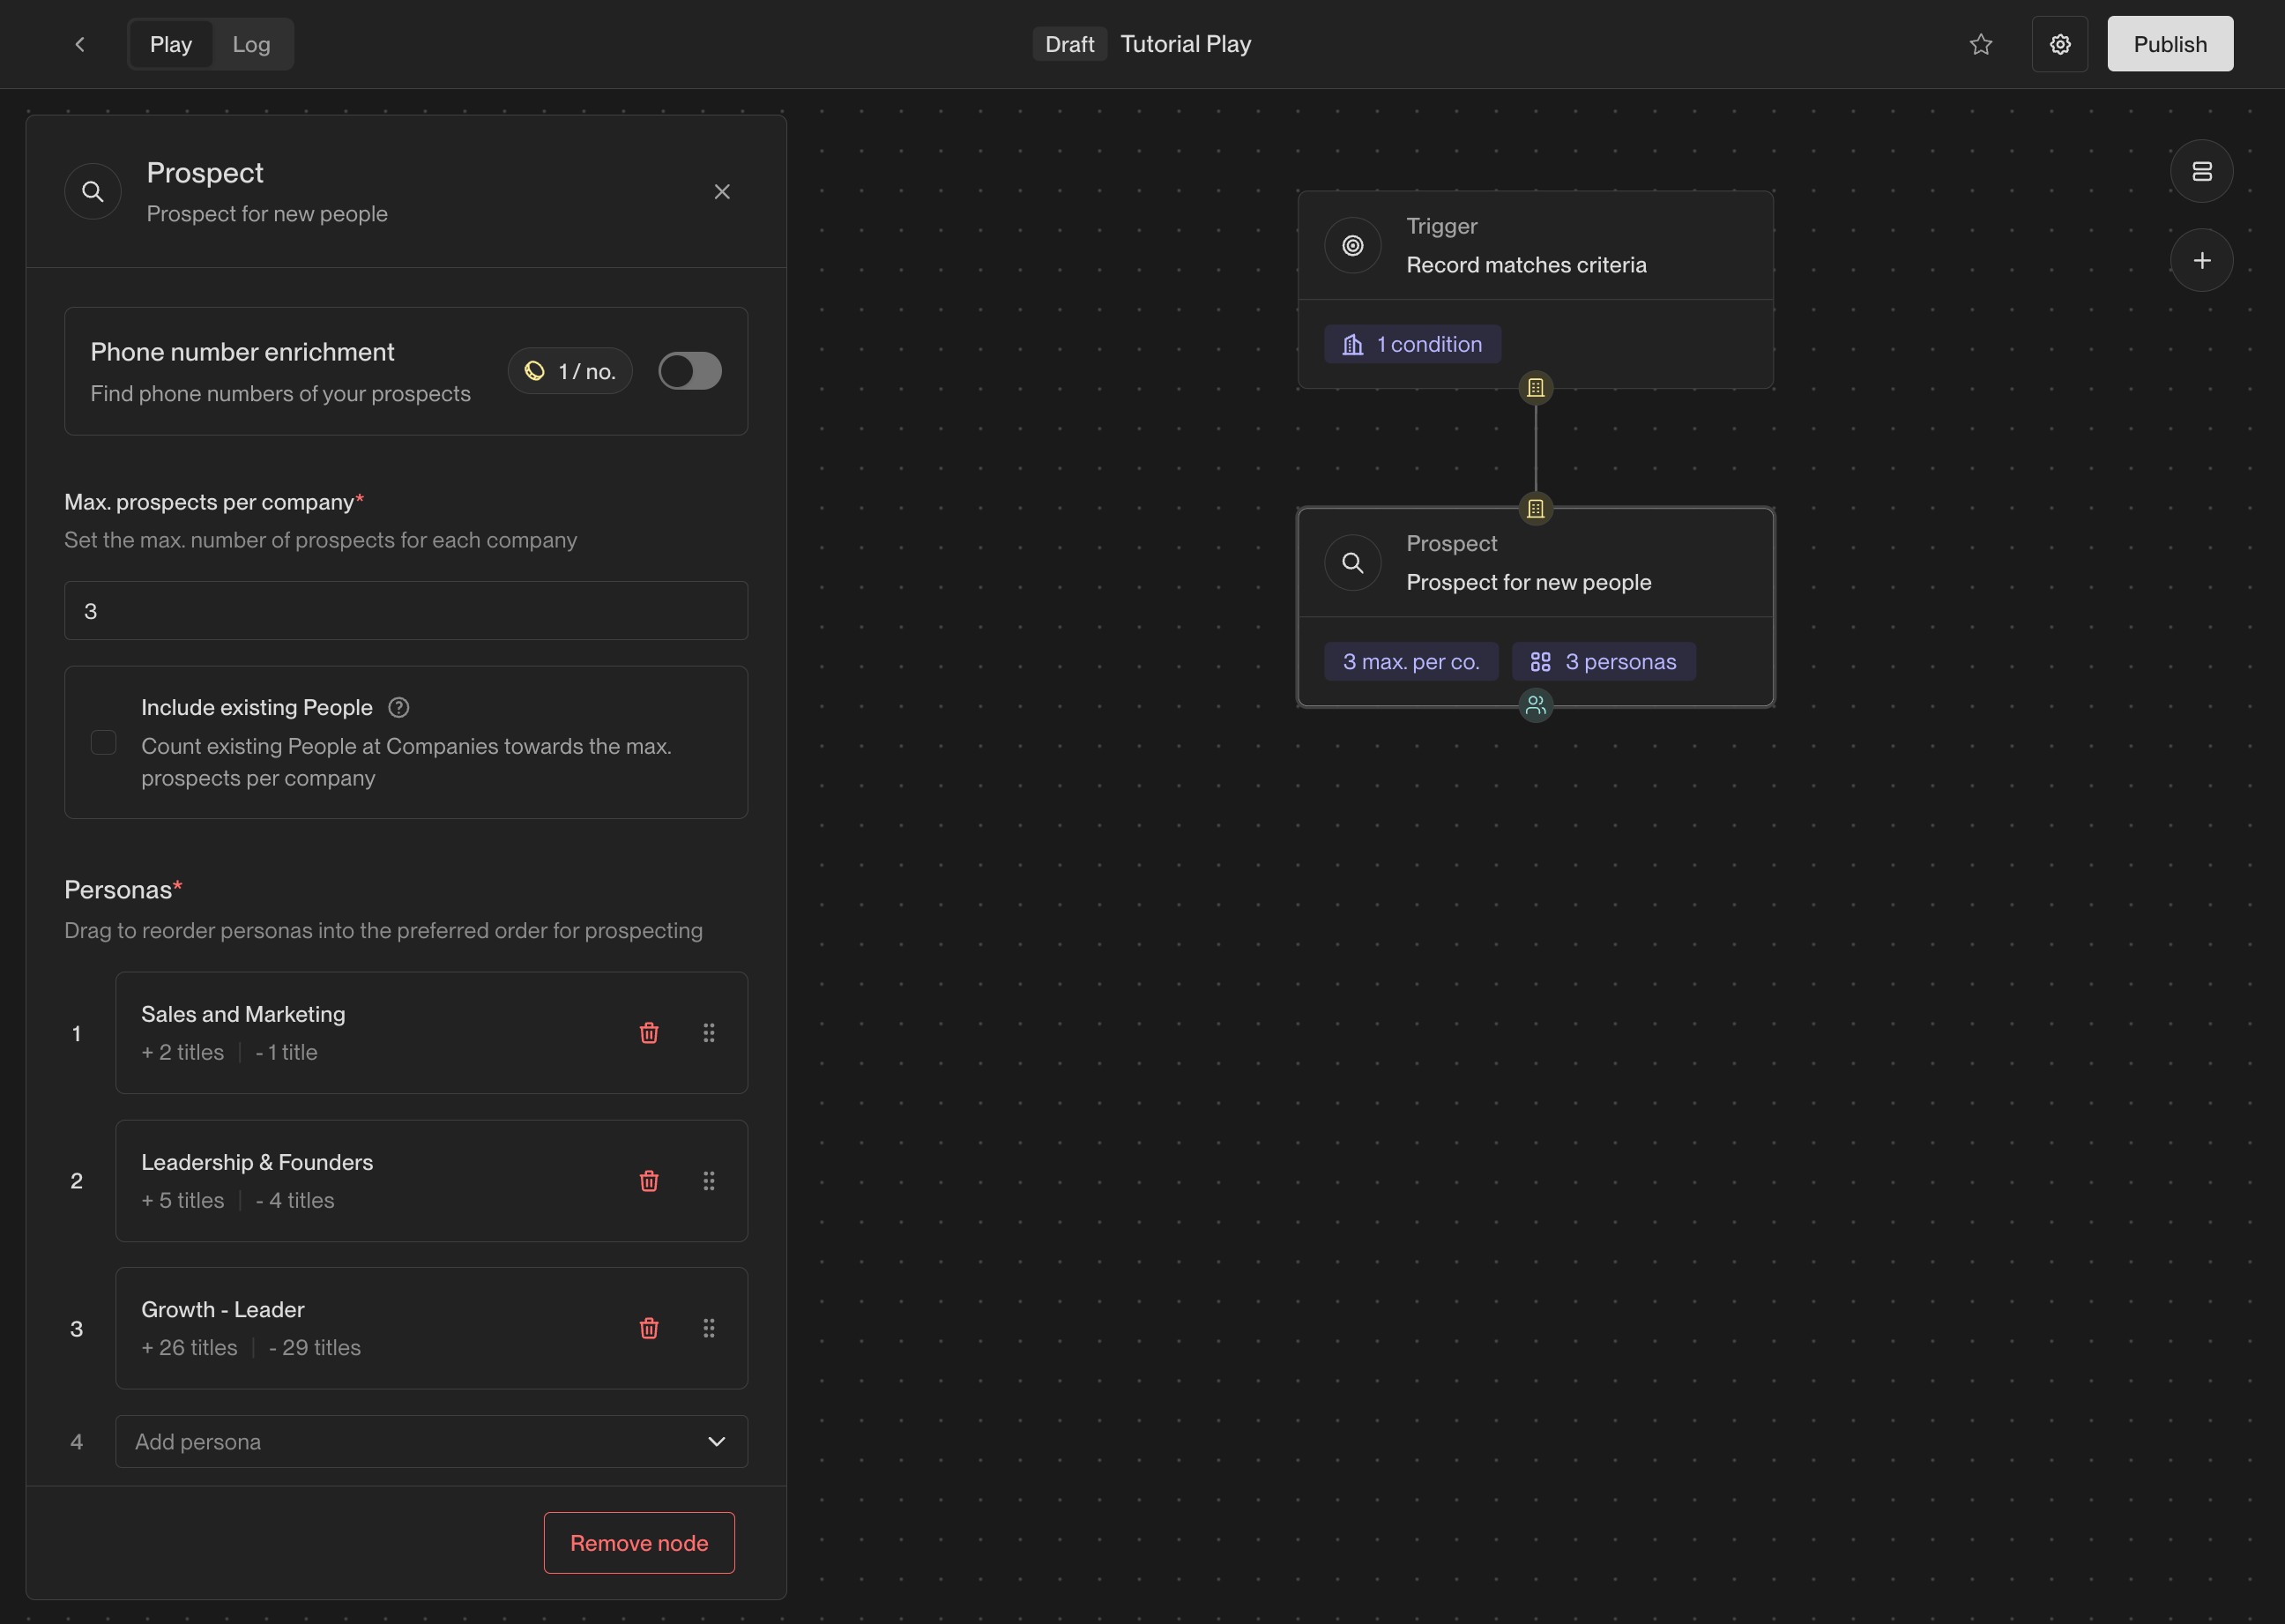
    ### Prospect for people

    Start by adding a prospecting action. This action will take the company coming
    from the trigger and search for relevant prospects. Drag the **Prospect for People**
    action from the action list and drop it into the builder.

    <Tip>
      If you drag and drop a new action on top of an existing action, it will
      automatically be connected to it.
    </Tip>

    <Frame caption="Drag and drop actions from the action list into the play builder.">
      <img src="https://mintcdn.com/unify-19/QTxNj2fcd-br9FnE/images/tutorials/how-to-create-a-play/play-builder-prospect-action.png?fit=max&auto=format&n=QTxNj2fcd-br9FnE&q=85&s=8a70d73cc70fdda3719cfee1e81ac4bd" alt="Drag and drop actions from the action list into the play builder." width="2592" height="1842" data-path="images/tutorials/how-to-create-a-play/play-builder-prospect-action.png" />
    </Frame>

    Once added, you will see the prospecting options shown in the configuration
    panel on the left. Here are the most important selections to make:

    * **Max. prospects per company**: This is how many prospects you want to find at
      each company. We recommend starting with 2-4 prospects per company.
    * **Personas**: These are the personas to search for. You can select from
      existing personas or create new ones. Unify will find people matching these
      personas in order, so list them in order of preference.

    If you haven't defined any personas yet, you can learn how to do so in the
    tutorial [How to create personas](/tutorials/how-to-use-personas).

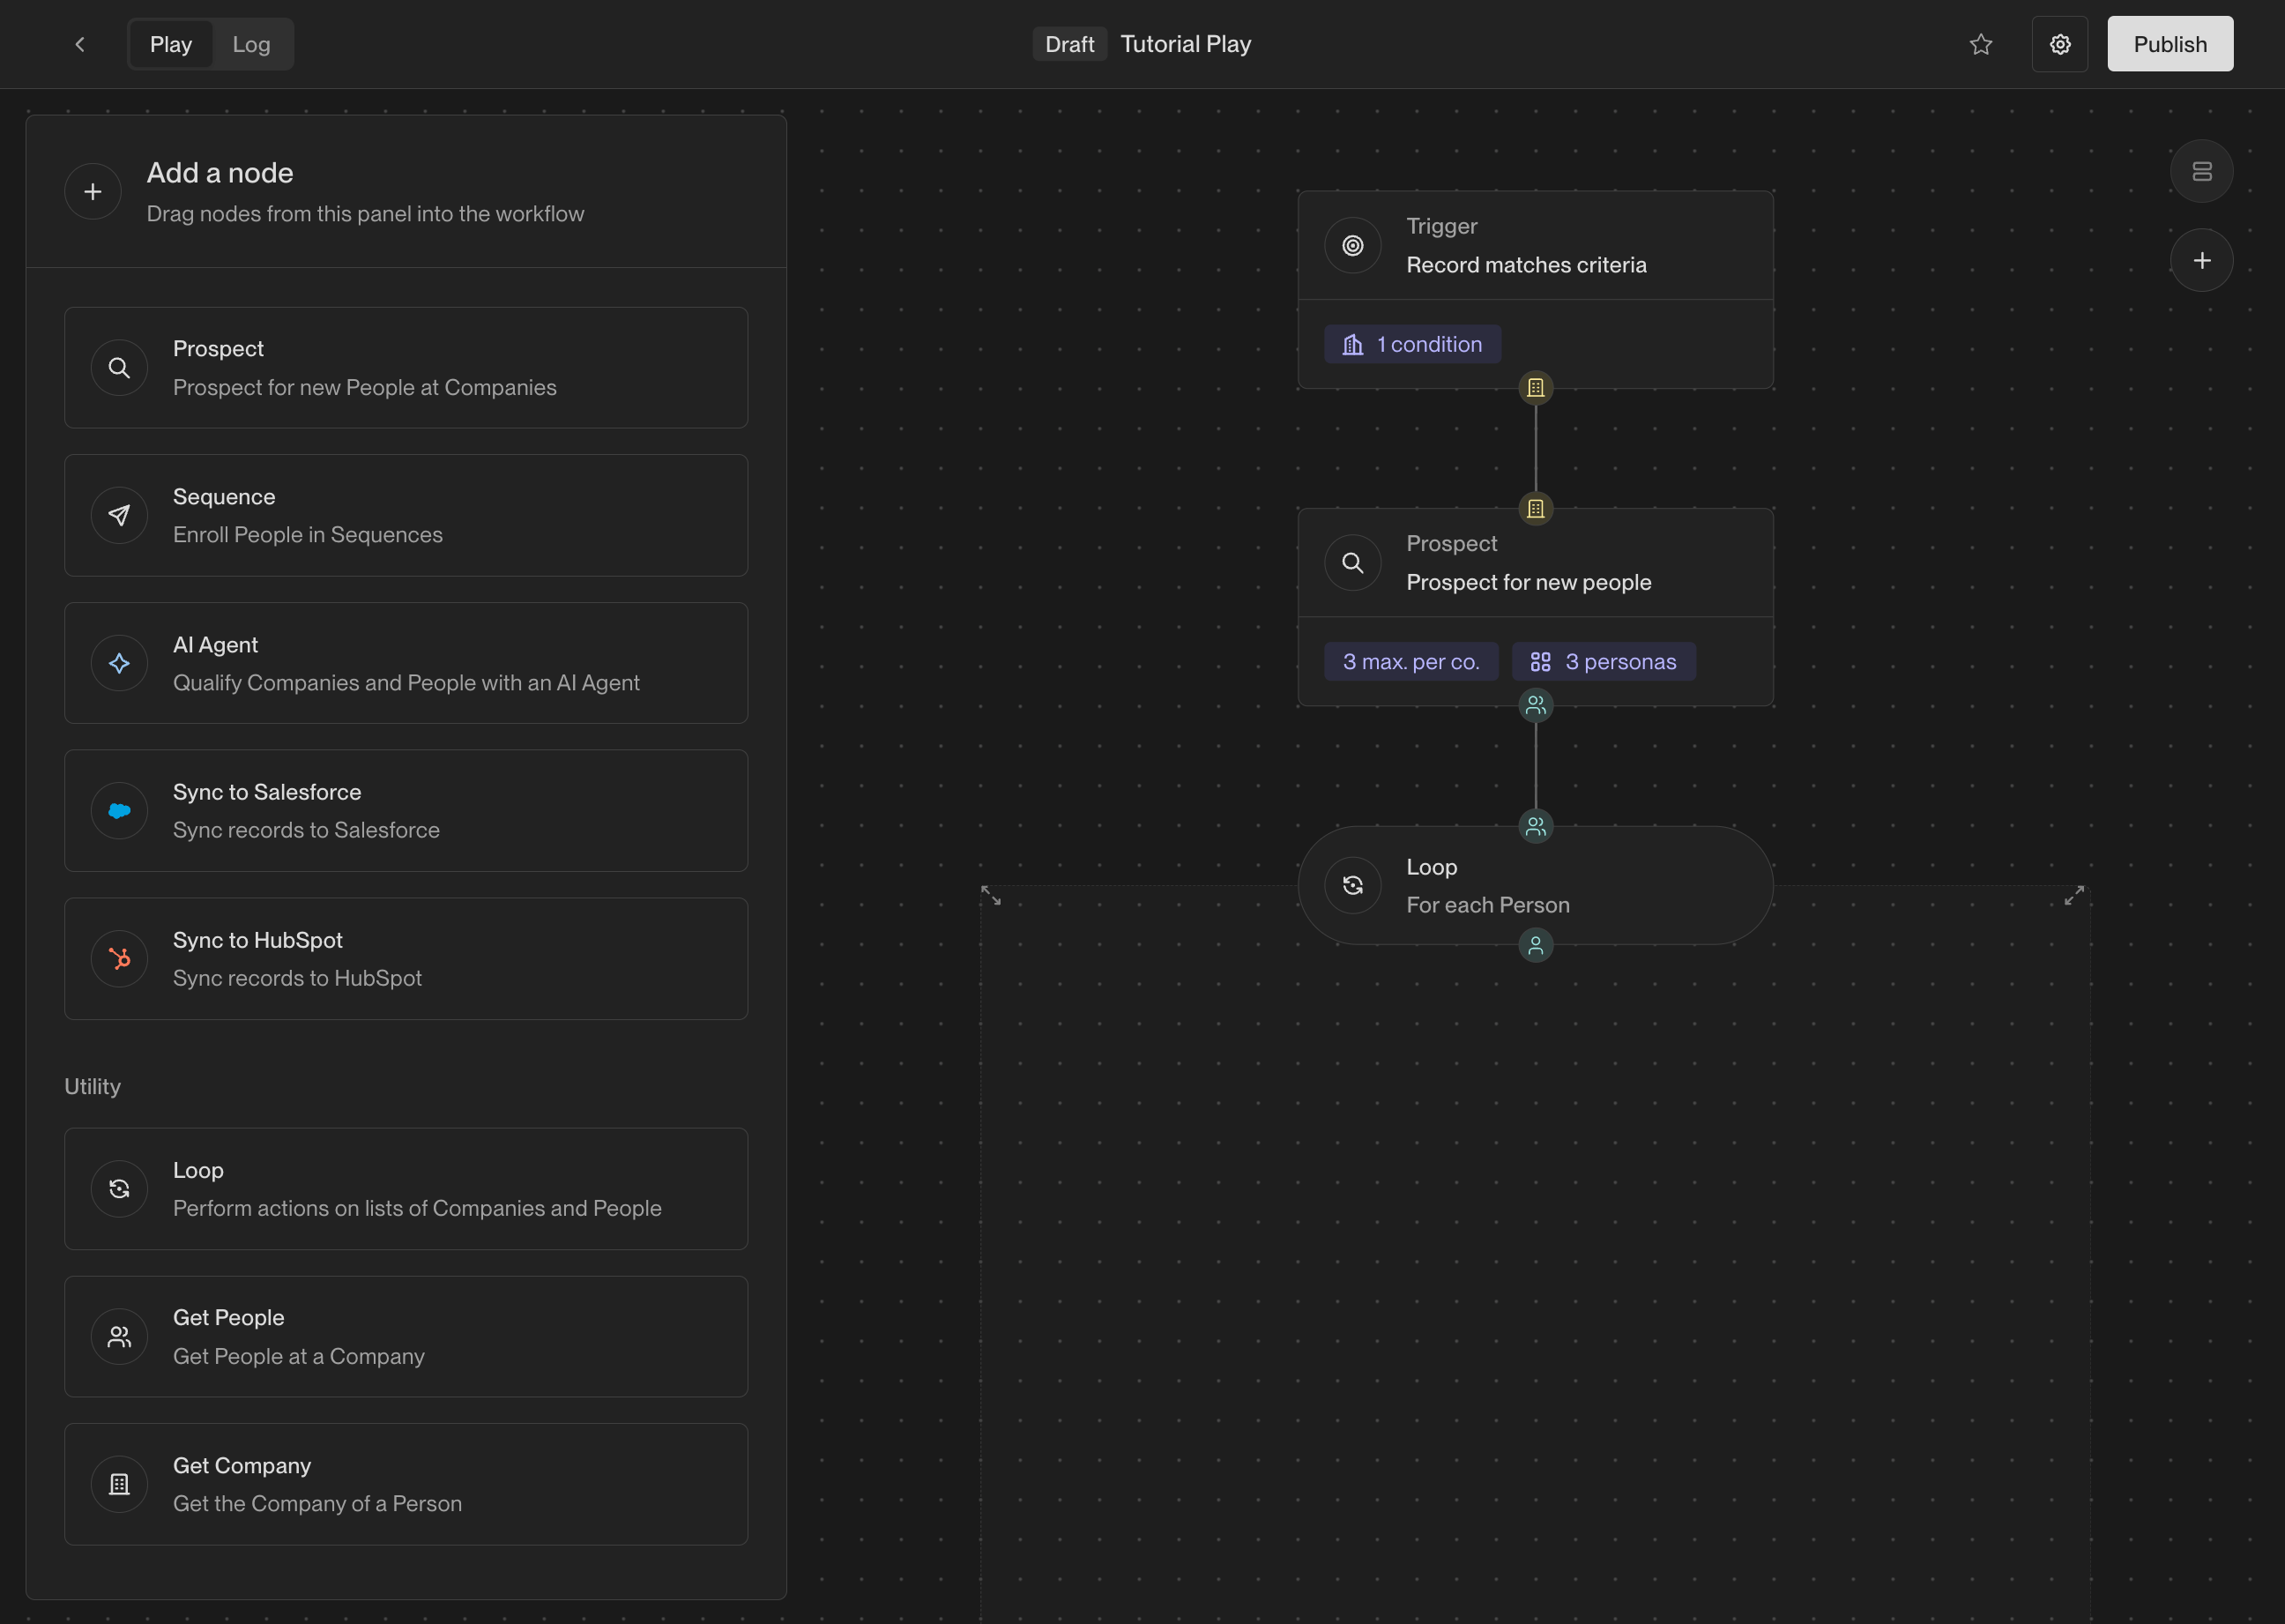
    ### Loop

    Next, add a **Loop** action. The prospecting action will return a list of people
    found at the company, and the loop will run subsequent actions once for each
    person in the list.
    <Frame caption="Add a loop and connect it to the prospecting action.">
      <img src="https://mintcdn.com/unify-19/QTxNj2fcd-br9FnE/images/tutorials/how-to-create-a-play/play-builder-loop-action.png?fit=max&auto=format&n=QTxNj2fcd-br9FnE&q=85&s=0b1d2ae66f5b9cac90f2458dc80e1b3b" alt="Add a loop and connect it to the prospecting action." width="2592" height="1842" data-path="images/tutorials/how-to-create-a-play/play-builder-loop-action.png" />
    </Frame>

    Each action receives an input and produces an output. Actions in the play
    builder have small colored symbols that represent what type of input and output
    they expect.

    Here's what each symbol represents:

    | Symbol | Value |
    | :-: | :- |
    | {<PlayBuilderPersonHandleLight />}{<PlayBuilderPersonHandleDark />} | A single person record. |
    | {<PlayBuilderPersonListHandleLight />}{<PlayBuilderPersonListHandleDark />} | A list of one or more person records. |
    | {<PlayBuilderCompanyHandleLight />}{<PlayBuilderCompanyHandleDark />} | A single company record. |

    Plays work by connecting each action's output to a matching input on another
    action. This is how data flows through the play and how each action knows what
    to do.

    Most actions run on one record at a time. The **Loop** action is how you take a
    list of records and run actions on them one by one.

    ### Sequence enrollment

    Before adding this action, [create and publish a template sequence](/reference/sequences/create-a-sequence)
    and connect a sending mailbox. Review its [ruleset](/reference/sequences/rulesets)
    to apply exclusions and enrollment limits, then choose a
    [send schedule](/reference/sequences/send-schedules) for your audience.

    Place a **Sequence** action inside the loop to enroll each eligible person in
    that sequence.

    <Tip>
      Once you've dropped the action into the loop, you can drag it near the loop
      action to automatically connect them. You can also manually draw connections
      between the colored icons that represent action inputs and outputs.
    </Tip>

    Click **Add persona routing**. For this example, use the same sequence for all
    people found by the prospecting action: select the sending mailbox and sequence
    in the **Everyone** route, then click **Done**.

    <ThemedImageFrame lightSrc="/images/reference/plays/actions/play-sequence-routing-light.png" darkSrc="/images/reference/plays/actions/play-sequence-routing-dark.png" alt="The routing dialog with one mailbox and sequence selected for everyone reaching the action." />

    When different personas need different messaging, add persona routes instead.
    [Sequence routing](/reference/plays/actions#sequence) explains that option,
    owner-based mailbox selection, and limits on enrollments per company.

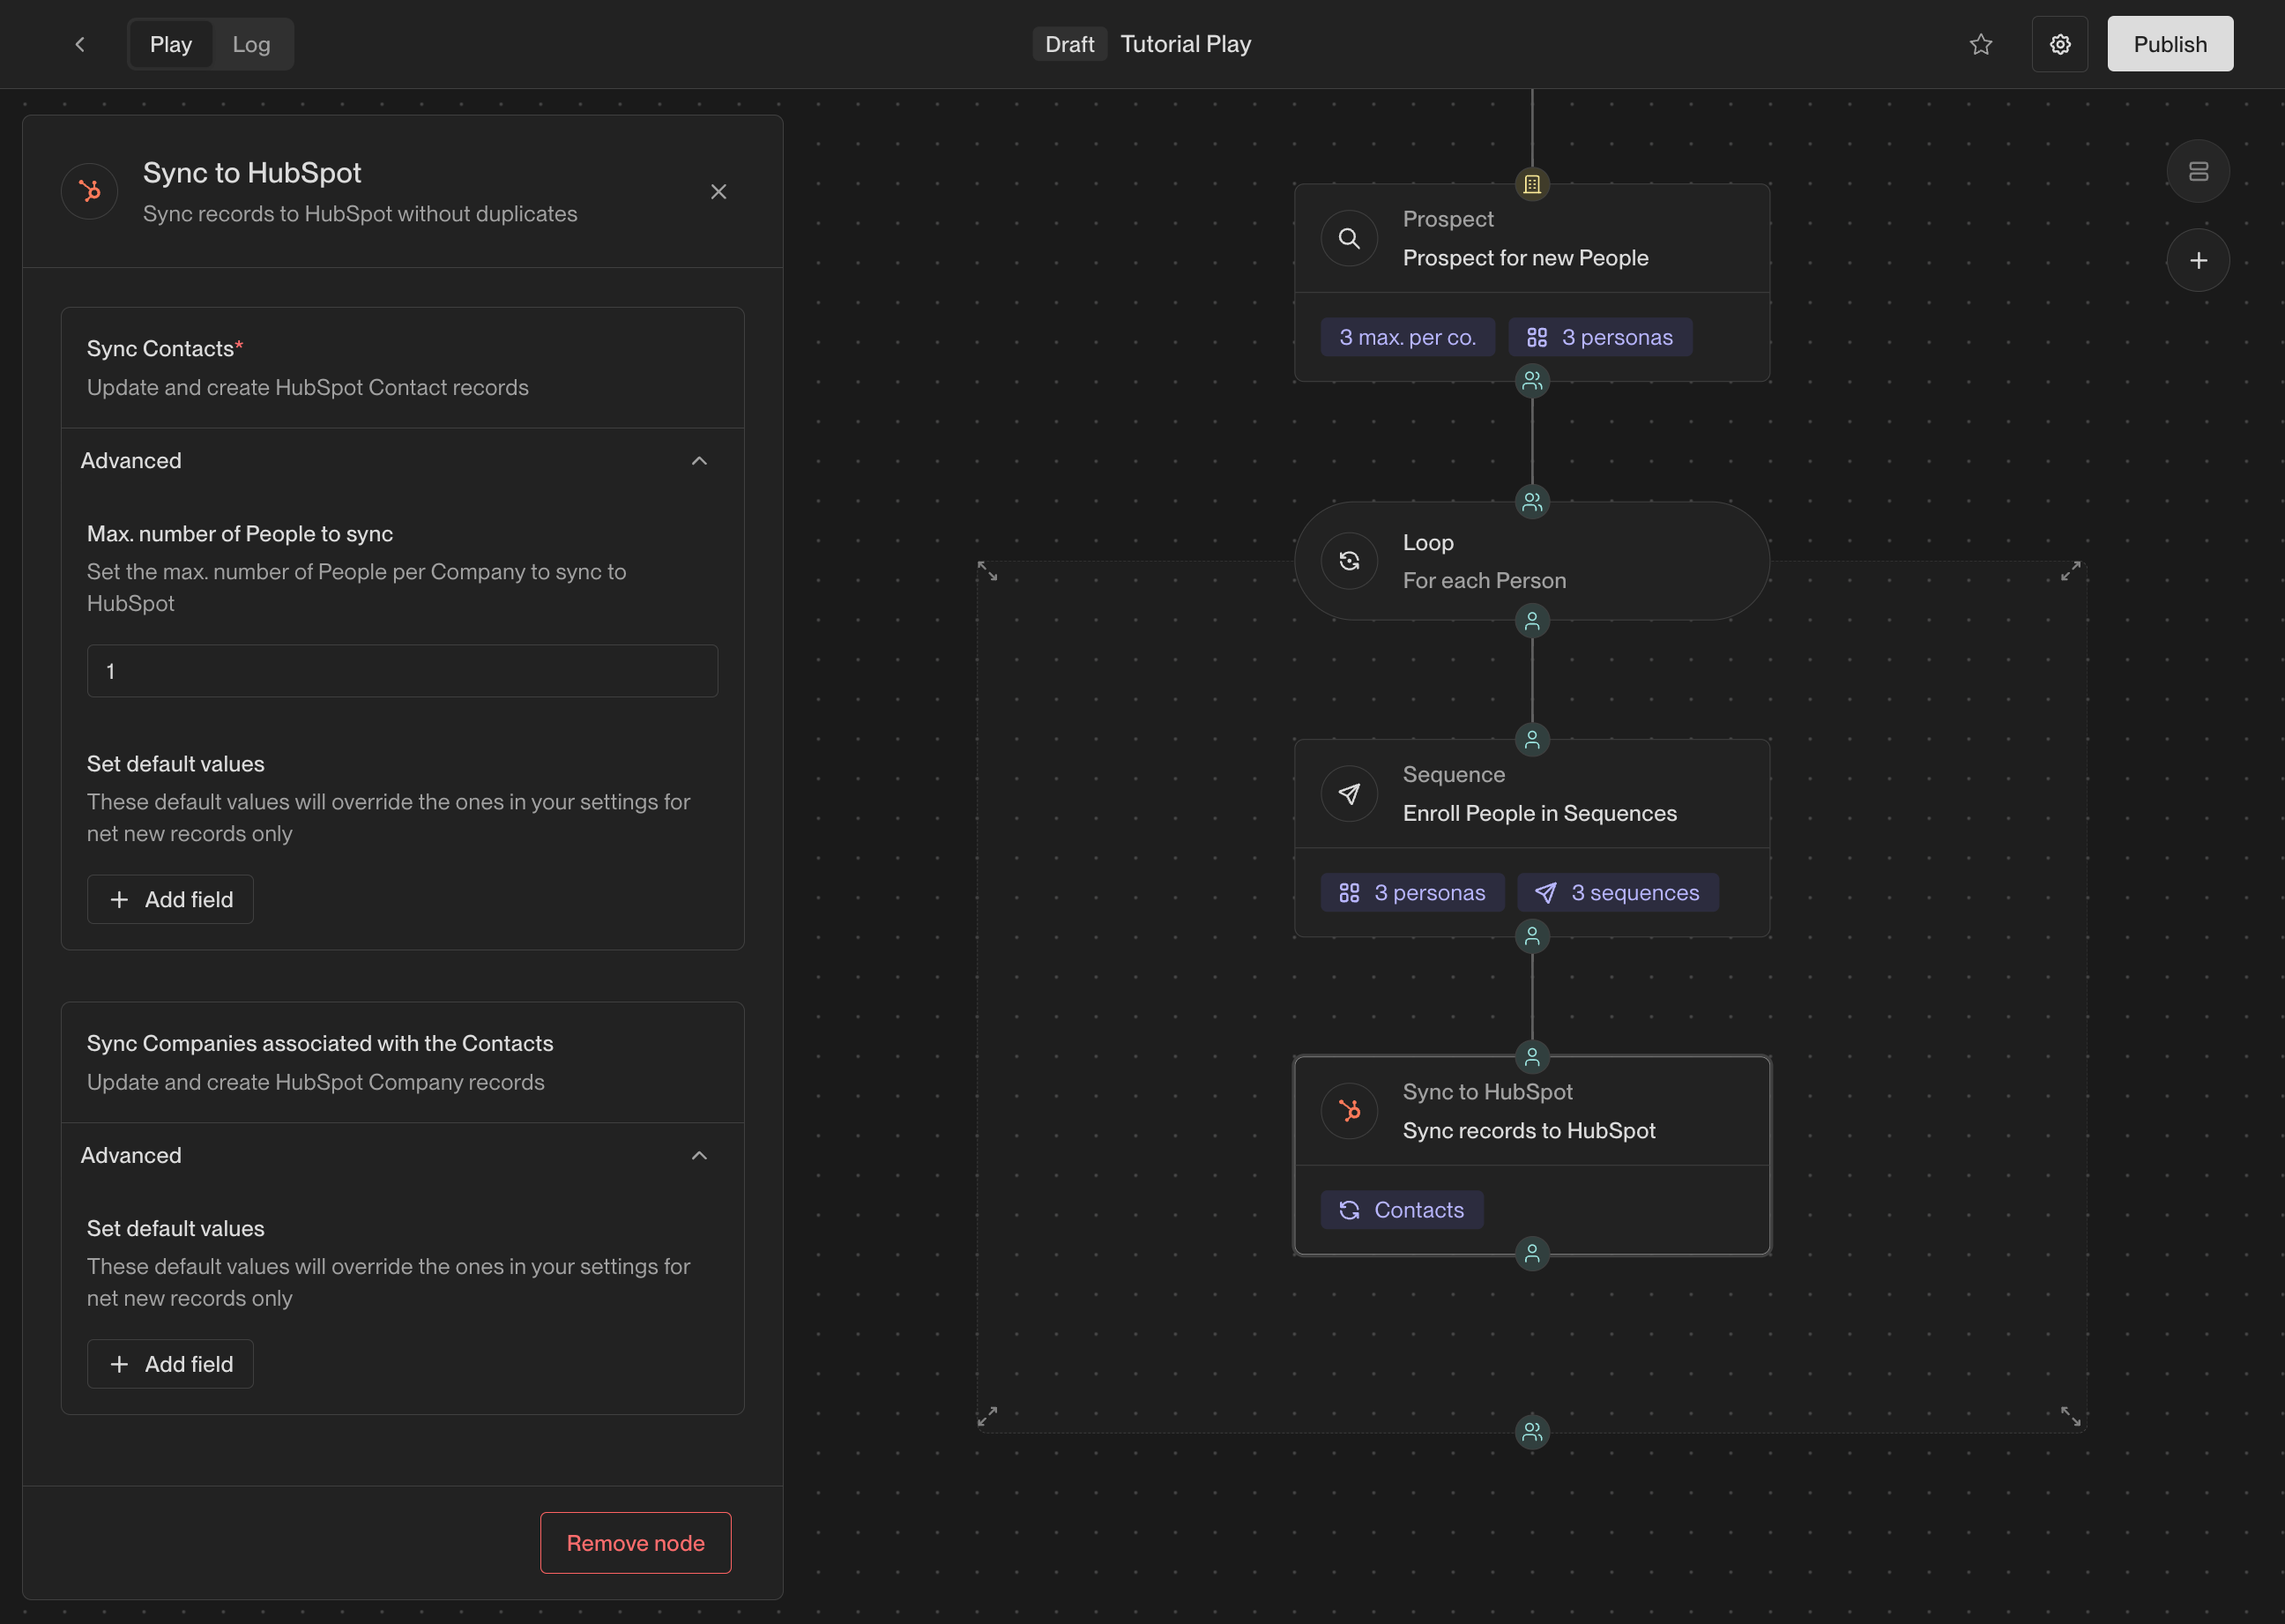
    ### Sync to CRM

    Finally, add an action to sync each new person to your CRM. Depending on which
    CRM you've connected in Unify, you will see either a **Sync to Salesforce** or
    **Sync to HubSpot** action.

    <Frame caption="You can specify default field values or limit the number of people synced per company.">
      <img src="https://mintcdn.com/unify-19/QTxNj2fcd-br9FnE/images/tutorials/how-to-create-a-play/play-builder-hubspot.png?fit=max&auto=format&n=QTxNj2fcd-br9FnE&q=85&s=d42ba7dda013eb2ba49eceb901d9b779" alt="You can specify default field values or limit the number of people synced per company." width="2592" height="1842" data-path="images/tutorials/how-to-create-a-play/play-builder-hubspot.png" />
    </Frame>
  </Step>

  <Step title="Publish and view logs">
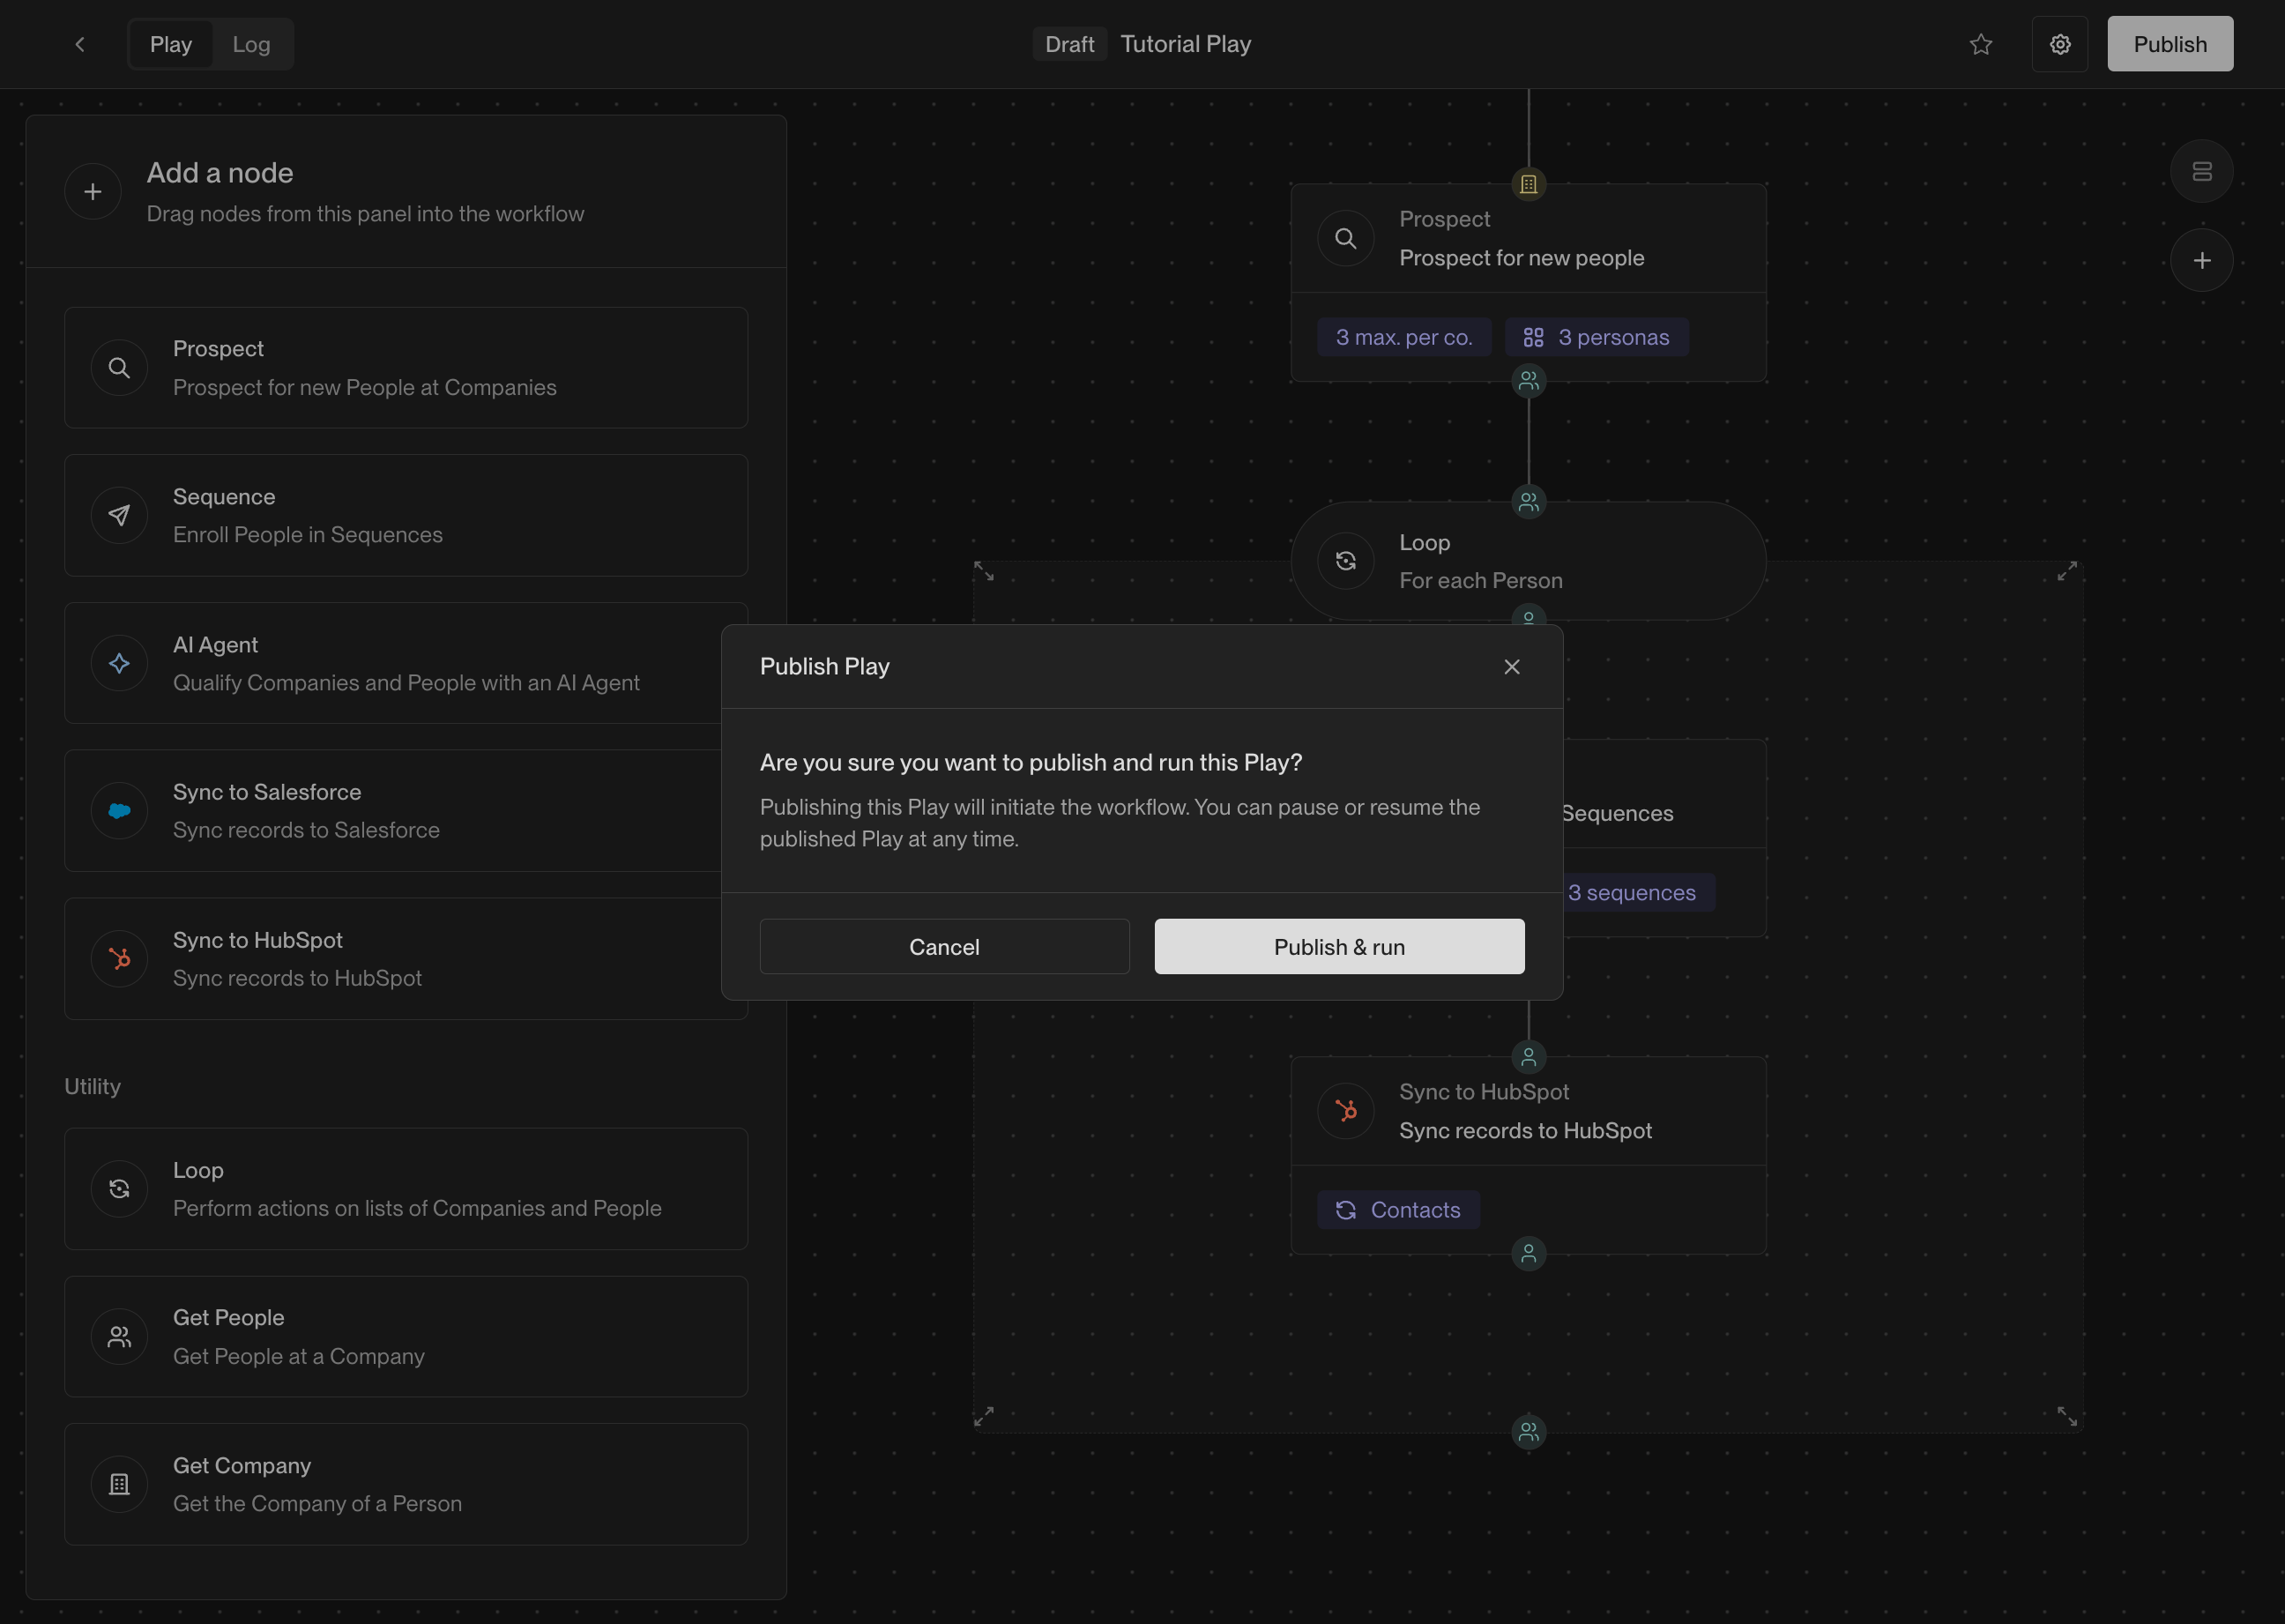
    Once your play is ready, click **Publish** in the top right corner of
    the play builder. This will activate the play and start running it on companies
    that match the trigger criteria you defined earlier.

    <Frame caption="Publishing activates the play's trigger.">
      <img src="https://mintcdn.com/unify-19/QTxNj2fcd-br9FnE/images/tutorials/how-to-create-a-play/play-builder-publish.png?fit=max&auto=format&n=QTxNj2fcd-br9FnE&q=85&s=f9b85788f676e11eb97609bbe85b2c7d" alt="The publish confirmation for the website-visitor play." width="2592" height="1842" data-path="images/tutorials/how-to-create-a-play/play-builder-publish.png" />
    </Frame>

    As the play starts to run on companies, you will see them appear in the logs.
    Click on the **Logs** tab at the top of the play builder to view the logs.
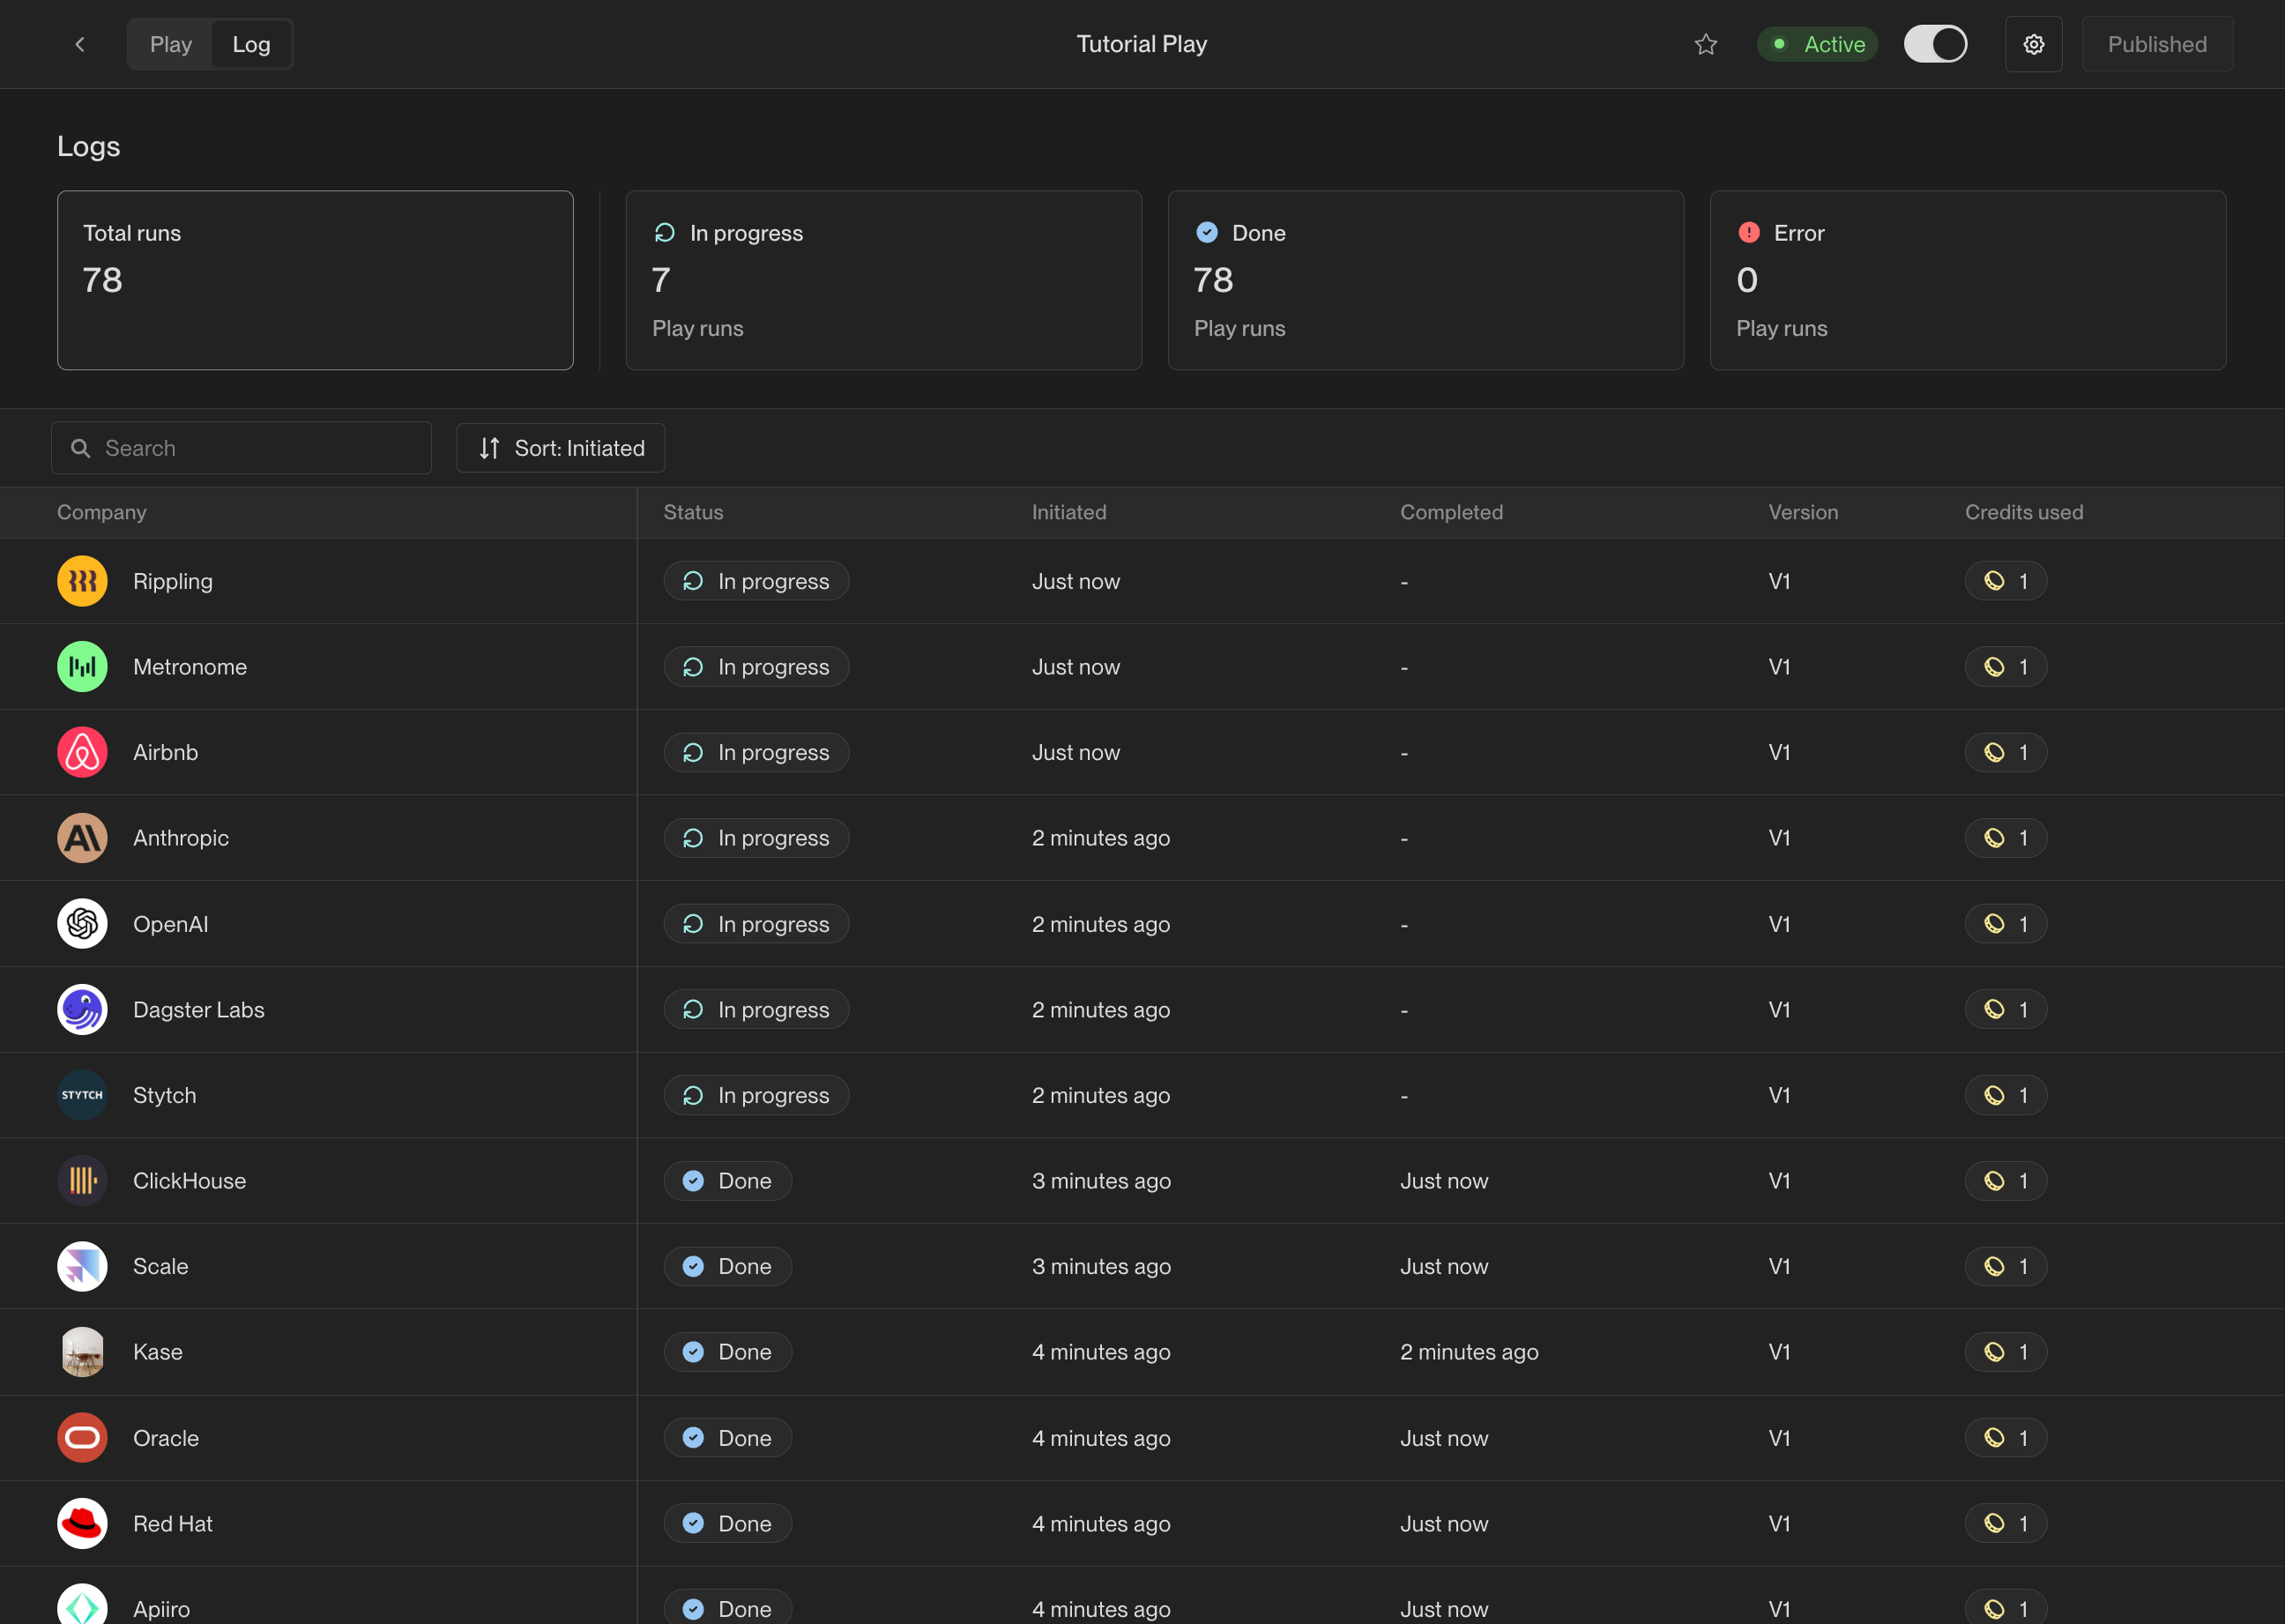
    <Frame caption="Logs show a detailed view of every company or person a play has run on.">
      <img src="https://mintcdn.com/unify-19/QTxNj2fcd-br9FnE/images/tutorials/how-to-create-a-play/play-logs.png?fit=max&auto=format&n=QTxNj2fcd-br9FnE&q=85&s=0000cbd964af7144fda4bf0a96f48718" alt="Logs show a detailed view of every company or person a play has run on." width="2592" height="1842" data-path="images/tutorials/how-to-create-a-play/play-logs.png" />
    </Frame>

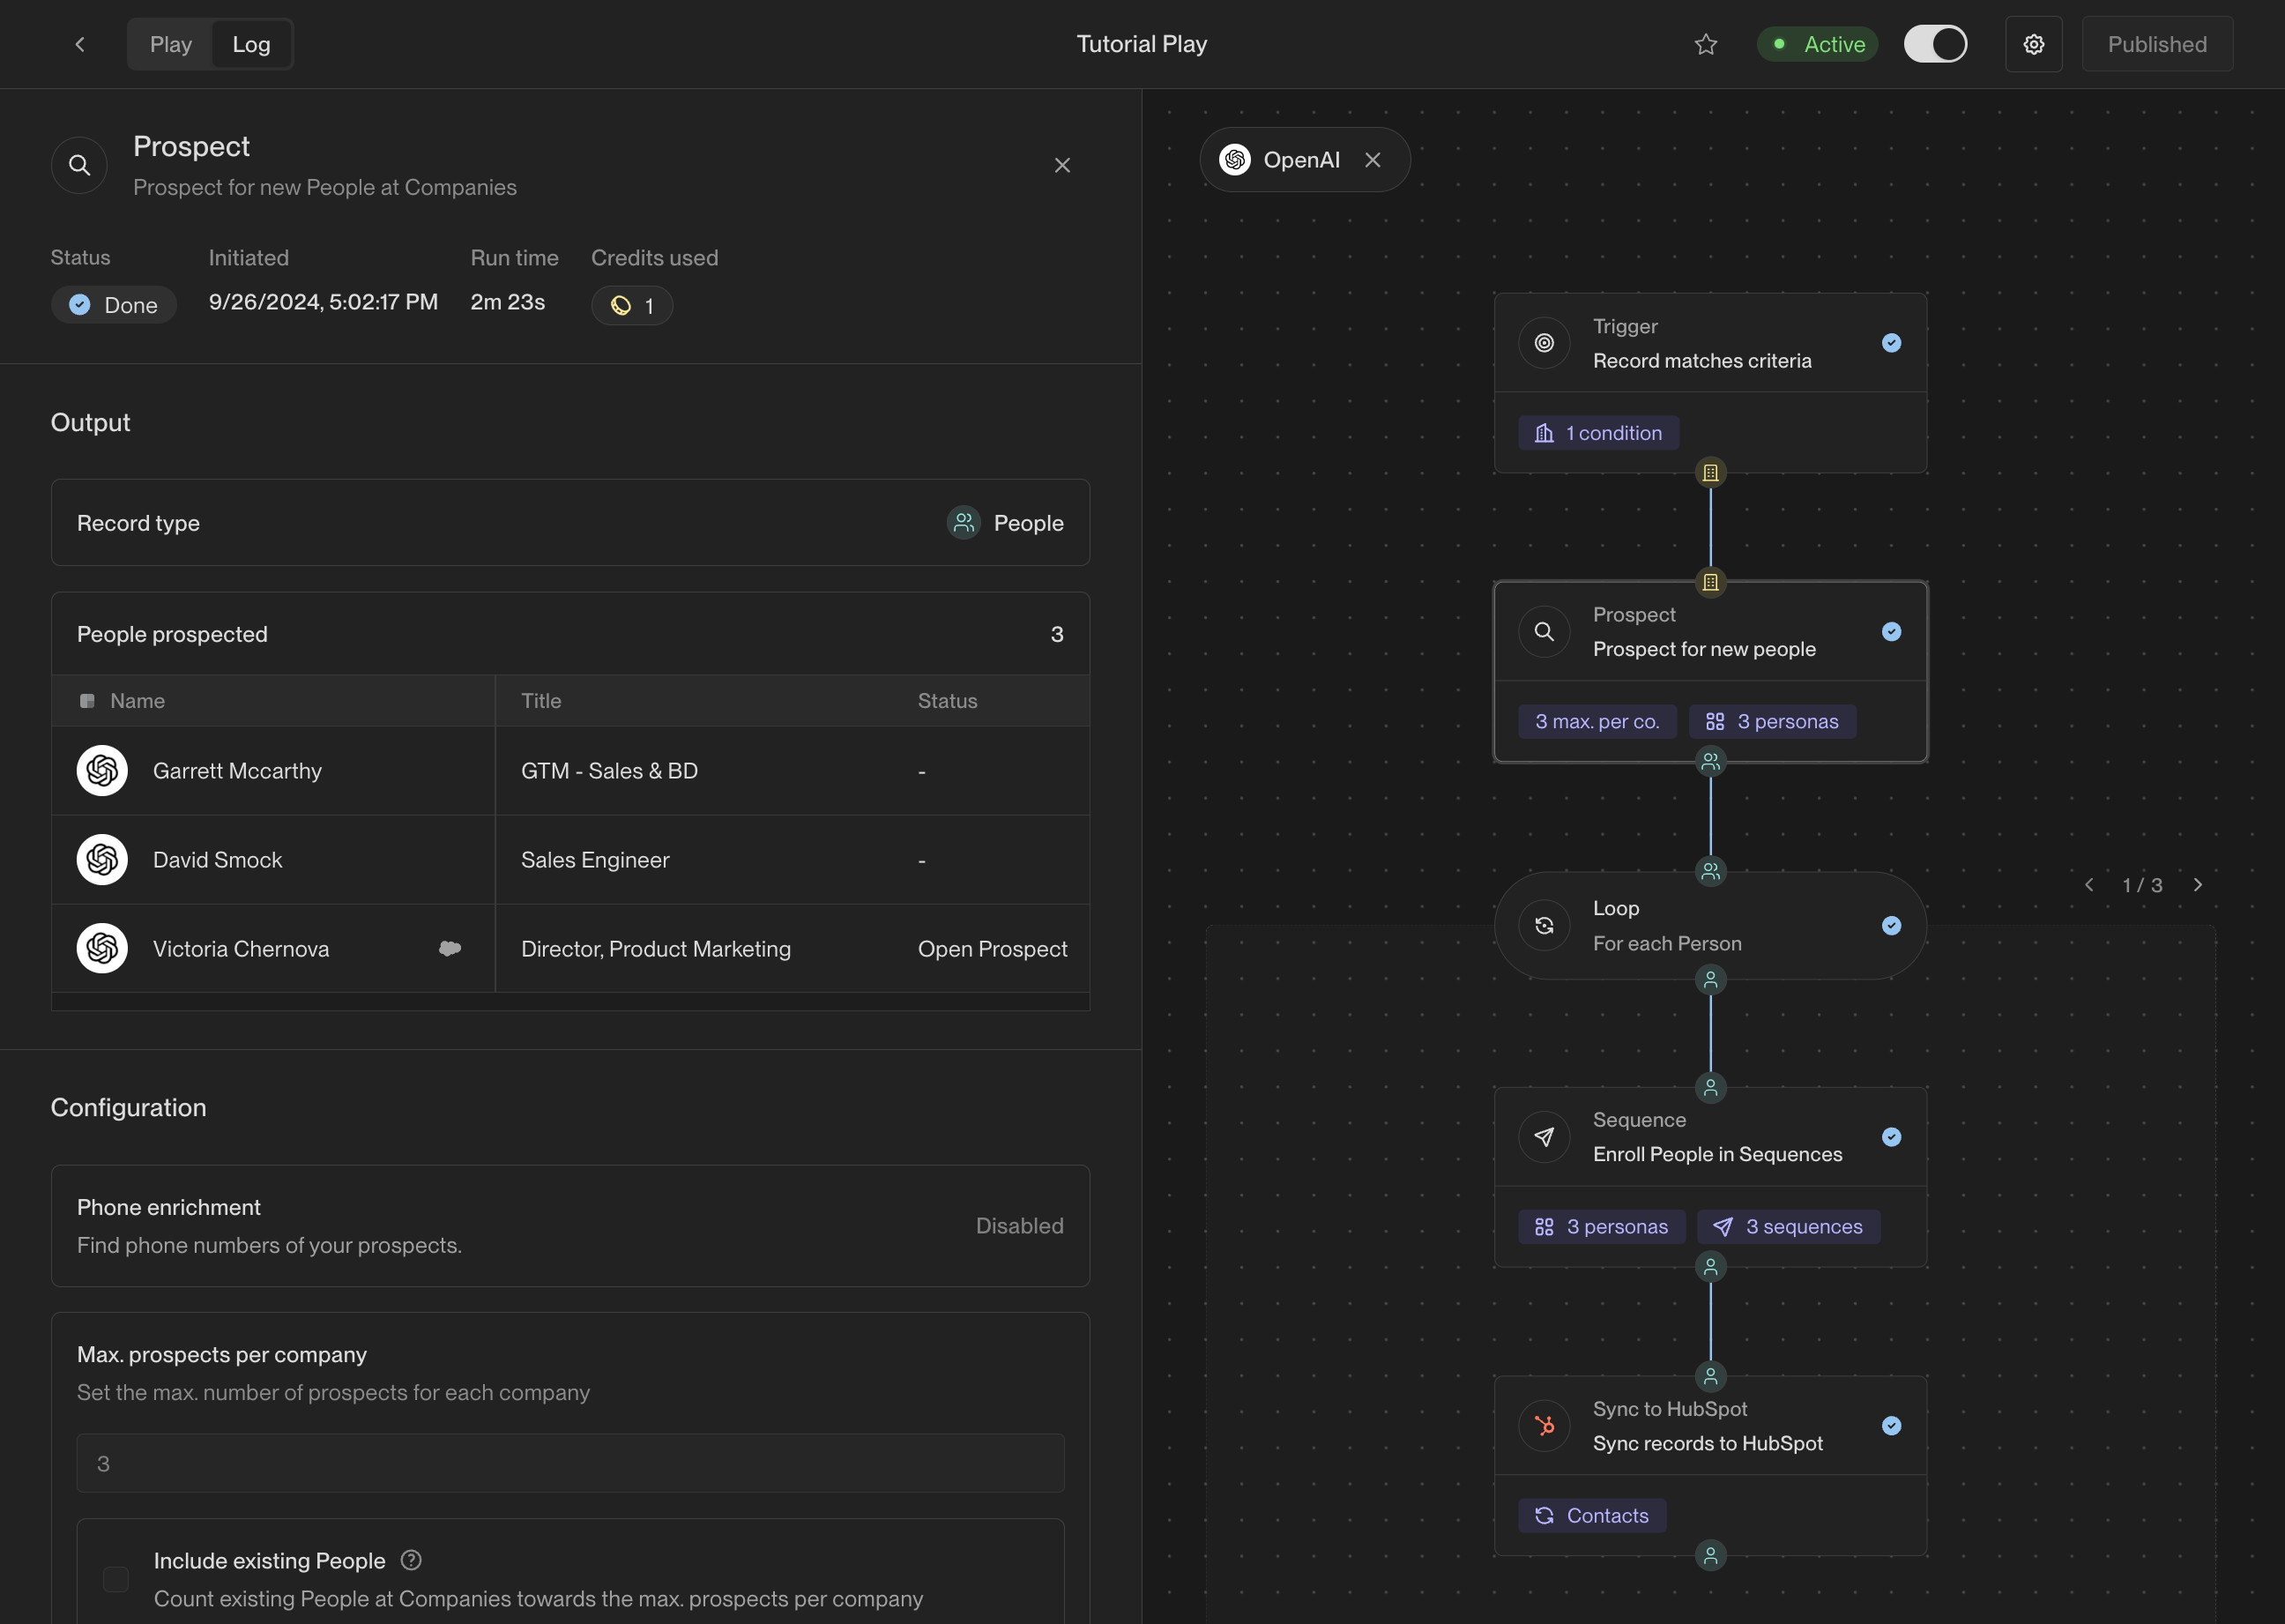
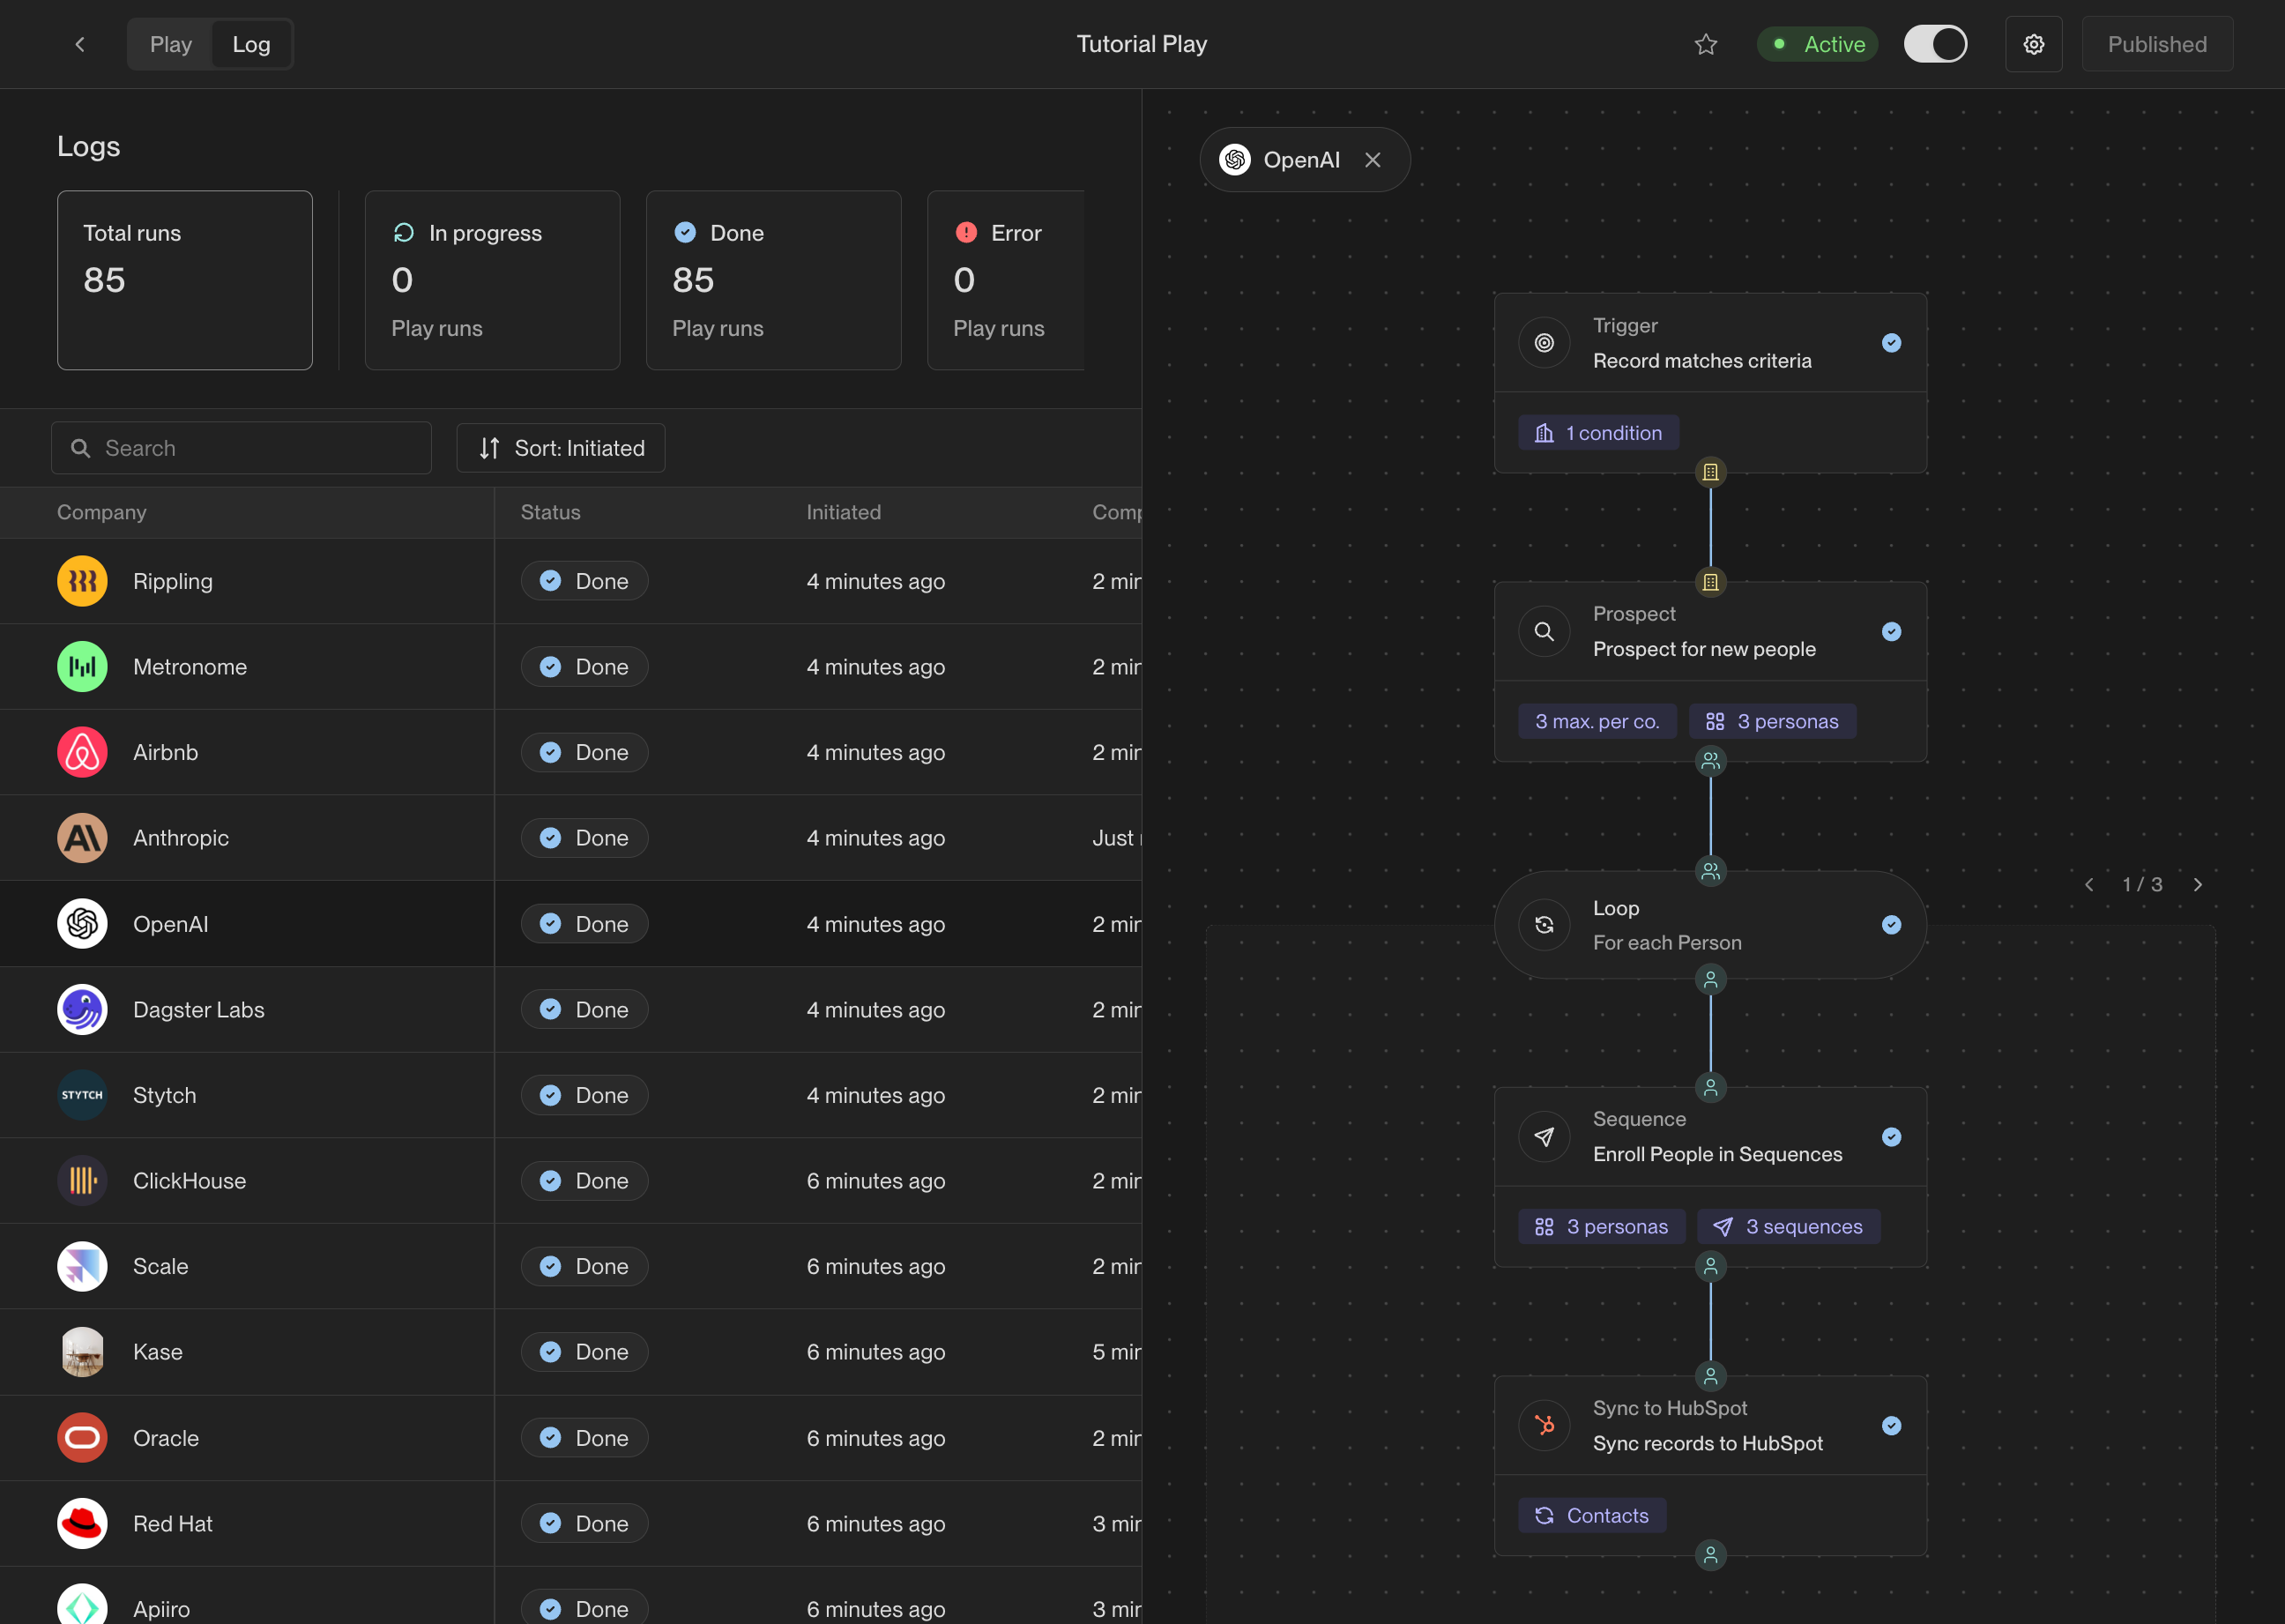
    Click on any company to view the details of its run, including the exact actions
    that were taken and the results of each action. Click on any action to view the
    precise inputs, outputs, and result of that action.
    <Frame caption="Click on any company to view exactly what the play did.">
      <img src="https://mintcdn.com/unify-19/QTxNj2fcd-br9FnE/images/tutorials/how-to-create-a-play/play-logs-details.png?fit=max&auto=format&n=QTxNj2fcd-br9FnE&q=85&s=9020f1aad71fc48334b3846d4830c5c8" alt="Click on any company to view exactly what the play did." width="2592" height="1842" data-path="images/tutorials/how-to-create-a-play/play-logs-details.png" />
    </Frame>

    <Frame caption="Click on any action within the log details to see its results.">
      <img src="https://mintcdn.com/unify-19/QTxNj2fcd-br9FnE/images/tutorials/how-to-create-a-play/play-logs-details-prospect-action.png?fit=max&auto=format&n=QTxNj2fcd-br9FnE&q=85&s=91ad526c9c77c88ecf003a903a945f92" alt="Click on any action within the log details to see its results." width="2592" height="1842" data-path="images/tutorials/how-to-create-a-play/play-logs-details-prospect-action.png" />
    </Frame>

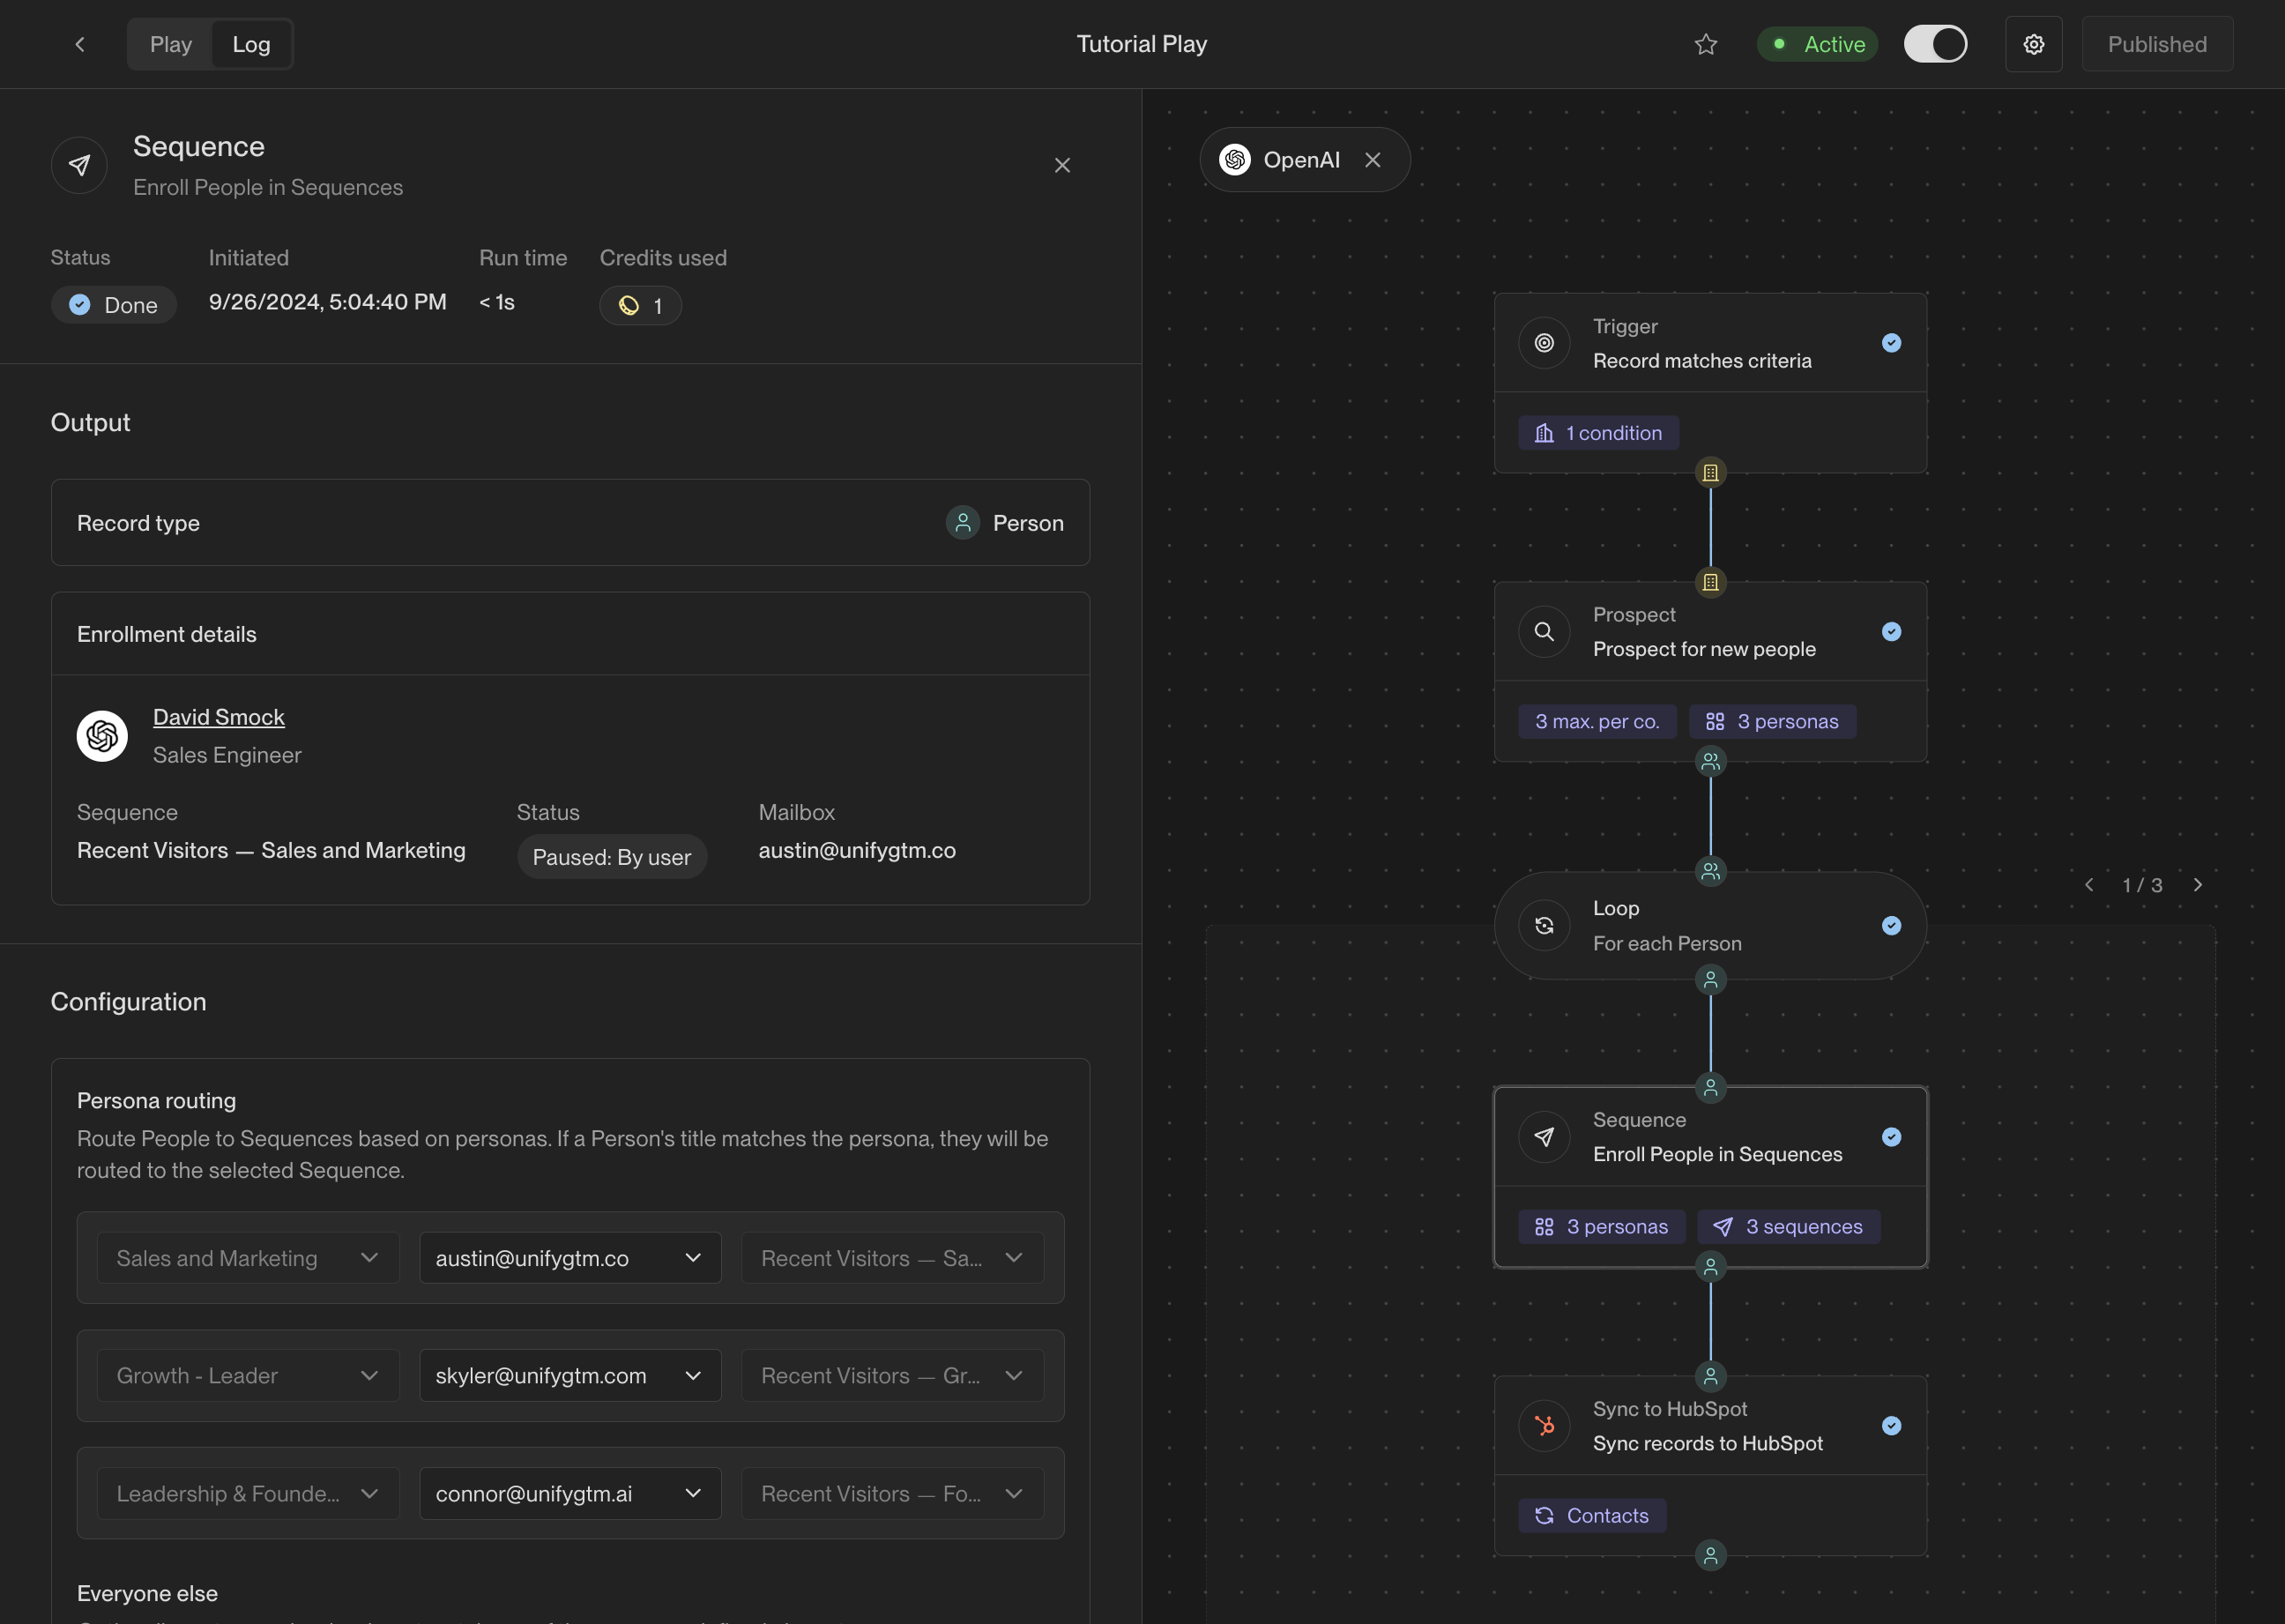
    <Frame caption="You can use the action logs to inspect exactly how a play is working.">
      <img src="https://mintcdn.com/unify-19/QTxNj2fcd-br9FnE/images/tutorials/how-to-create-a-play/play-logs-details-sequence-action.png?fit=max&auto=format&n=QTxNj2fcd-br9FnE&q=85&s=765455e619d03172f32b7d50ae4fea94" alt="You can use the action logs to inspect exactly how a play is working." width="2592" height="1842" data-path="images/tutorials/how-to-create-a-play/play-logs-details-sequence-action.png" />
    </Frame>

    A successful sequence action creates an enrollment. Emails then wait for the
    sequence's schedule and the selected mailbox's capacity. If someone is skipped,
    review the action's result for the reason. Track enrolled people in the
    [enrollment table](/reference/sequences/enrollments), then filter
    [sequence results](/reference/sequences/results) by this play to review its
    outreach.
  </Step>
</Steps>

## Next steps

Use [play settings](/reference/plays/play-settings) to control reruns, or explore
other [triggers](/reference/plays/triggers) and [actions](/reference/plays/actions)
for your next workflow.


This documentation is built and hosted on [Mintlify](https://mintlify.com), a developer documentation platform.